Scott
Translating ideas into wireframes used to take hours of manual layout work. Today, artificial intelligence accelerates this process, but only if you know how to communicate with it. Many designers struggle with AI tools generating unusable flat images rather than editable interfaces. The secret to overcoming this hurdle lies in mastering prompt engineering. If you are searching for a reliable free prompt to UI designs workflow, this guide is your ultimate blueprint. We will explore exactly how to write an advanced AI prompt that actually yields editable, professional wireframes. By combining expert prompting frameworks with an advanced tool like Pixso AI, you can skip the tedious manual setup and jump straight into creative problem-solving.
Part 1: Moving beyond flat images with Pixso AI
General AI image generators might create beautiful concepts, but they are practically useless for product teams because they output flat pixels. As a product designer, you need an environment that speaks the language of user interfaces: components, frames, autolayout, and vector paths. This is where Pixso comes into the spotlight. Positioned as a powerful alternative to industry leaders like Figma, Axure, Sketch, and Adobe XD, Pixso is an enterprise-level collaborative design tool that has integrated artificial intelligence natively into the designer's workspace.
When you use a standard image generator, you get a flattened JPEG that you have to manually trace over. When you execute a free prompt to UI designs inside Pixso, you experience true tool-ready output. Every generated screen is seamlessly adapted to the canvas, complete with fully editable layers, standard UI components, and native Auto Layout structures intact. You are not just generating an image; you are generating a working file. Furthermore, Pixso ensures real UI compliance. Instead of outputting AI hallucinations with nonsensical buttons and alien text, the system draws upon standard design components, establishing logical user flows that are instantly ready for team review and developer handoff. It bridges the gap between text and actual interface creation flawlessly, preventing users from wasting time reverse-engineering generated art.
Part 2: Defining the designer's needs: why general prompts fail
Most designers fail at AI generation because they treat the AI like a generic search engine rather than a junior designer who needs specific instructions. Effective prompt engineering requires establishing clear boundaries and strict parameters. When looking for the best ai prompts to use in your daily workflow, you must address several critical design constraints that general text inputs ignore.
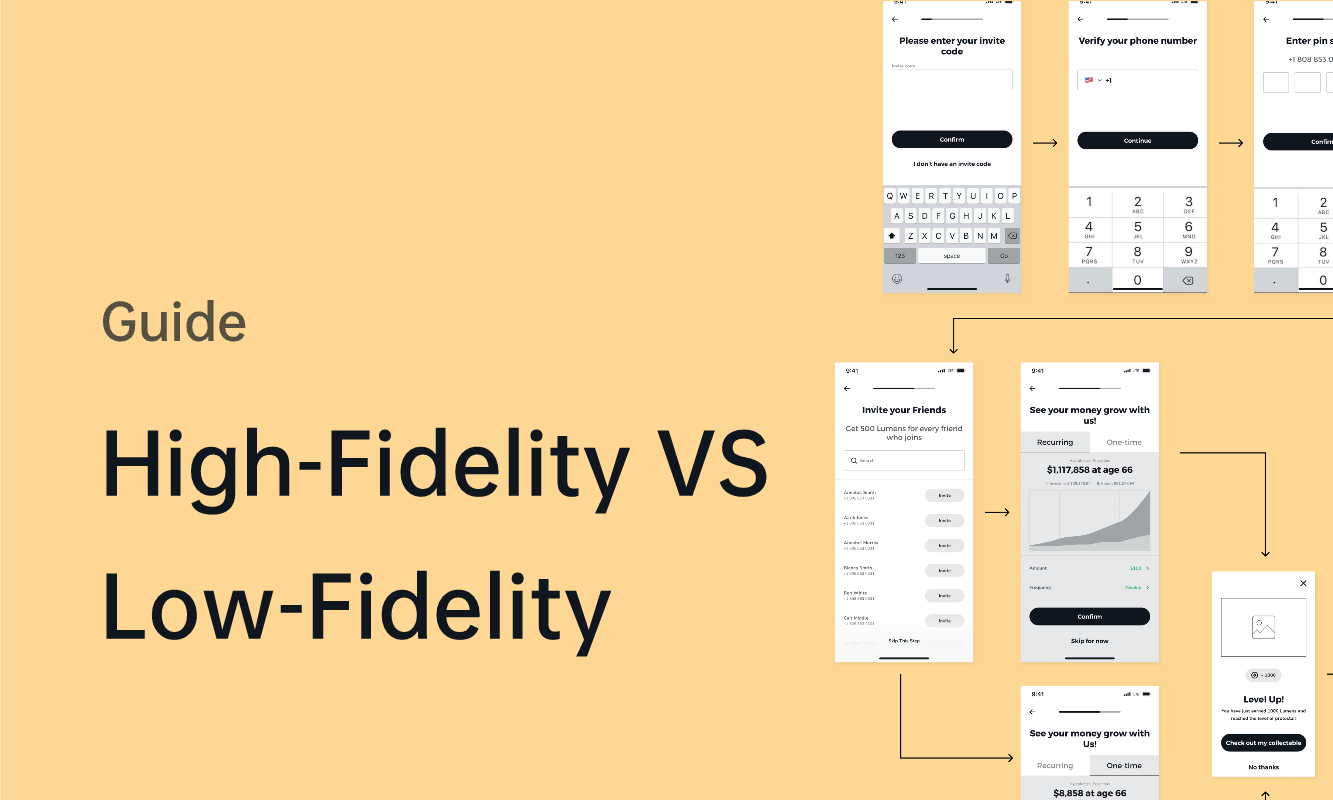
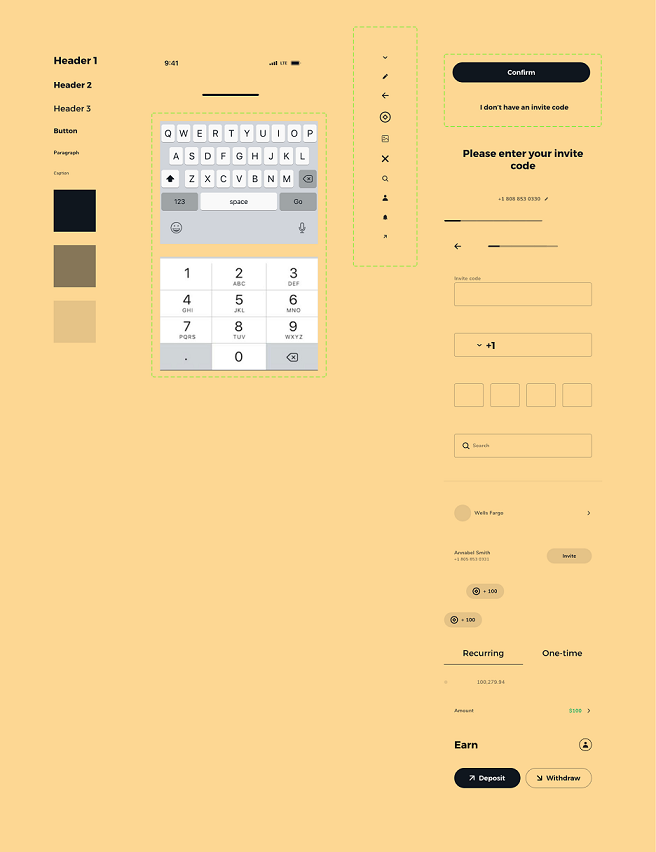
First is fidelity control. A major pain point in the UX process is jumping to high fidelity too early. Depending on your current phase, you need precise switching between low, mid, and high-fidelity wireframes. Your instructions should explicitly define whether you need structural gray-box wireframes for initial stakeholder alignment or polished, high-fidelity UI elements for final prototyping. For example, presenting a high-fidelity mockup to a client too early might result in them focusing on button colors rather than the core user journey.
Second is layout and grid precision. A usable wireframe must adhere strictly to modern web and mobile structural standards. Developers rely on strict, mathematically sound layouts. If your tool spits out a button that is 43 pixels high with inconsistent 11-pixel padding, it is fundamentally unusable in a professional pipeline. Your text instructions must demand adherence to a specific column grid, precise padding, responsive behavior, and strict typography hierarchy. Learning how to write an advanced AI prompt means learning how to translate these technical specifications into natural language that can be interpreted and rendered as editable vectors.
Part 3: The structured designer prompt framework
To stop gambling with your results, you must adopt a structured designer prompt framework. This is an engineered, fixed structure that makes your outputs reproducible, practical, and highly scalable across your entire design team. Instead of typing vague ideas, you construct a standardized formula that leaves absolutely no room for misinterpretation. Knowing how to write an advanced AI prompt comes down to utilizing this exact framework every single time you sit down to work.
A robust structural framework includes the following core components:
- Role: Define the persona. Example: "Act as a Senior UX Designer specializing in enterprise SaaS dashboards."
- Context: Explain the product and the target user. Context dictates the tone and density of information. Example: "We are building an analytics platform for marketing agencies that requires high data density."
- Task: Detail the specific screen required. Example: "Design the main dashboard wireframe."
- Constraints: This is where layout and grid precision come in. Example: "Use a 1440px desktop width, a 12-column grid, a collapsible sidebar navigation on the left, and a top app bar."
- Style: Dictate the fidelity and visual direction. Example: "Output a mid-fidelity wireframe using a monochrome palette with high contrast."
When you formulate design prompts using this exact skeleton, the AI stops guessing and starts executing. It shifts from being a random idea generator to a reliable drafting assistant. This structured approach allows teams to build a centralized repository of the best ai prompts, ensuring that any designer on the team can generate consistent, high-quality wireframes that adhere to internal company standards.
Part 4: Refining quality with negative constraints and iterations
Telling the AI what to do is only half the battle. The other crucial half is telling it what to avoid. Incorporating negative prompts is a game-changer in UI generation. Just like you constrain variables in code, you must strictly forbid errors in your design prompts. Explicitly command the system to exclude overlapping elements, prevent the use of meaningless dummy text that breaks layout scaling, and ban useless decorative graphics that confuse developers and do not serve the user experience. By setting these strict negative boundaries, you guarantee a clean, functional layout.
Additionally, generating a perfect interface is rarely a one-shot endeavor. It requires a highly iterative workflow. You should always move from rough concepts to refined details through multiple rounds of iterative optimization. Start with a broad structural prompt to establish the skeleton. Once the basic layout is generated, you can highlight specific sections and prompt the AI to refine that exact component. Because Pixso AI provides genuine tool-ready output, this iterative workflow is incredibly smooth. You can generate a base layout, manually tweak an Auto Layout frame, and then run another generation to populate a specific table or list within that very frame. This synergy between human intuition and machine speed represents the pinnacle of modern prompt engineering.
Part 5: Ready-to-use templates for your design arsenal
To accelerate your daily workflow, you should build a library of ready-to-use templates that cover multiple scenarios and are ready for one-click copying. Having a go-to free prompt to UI designs template drastically reduces the cognitive load required to start a brand new project. Here are some highly effective templates you can adapt immediately for your own use.
For a Mobile E-commerce Product Page:
"Act as a lead mobile UX designer. Create a high-fidelity wireframe for a mobile e-commerce product detail page. Include a full-width image carousel at the top, followed by a clear product title, a pricing block, user reviews, and a sticky 'Add to Cart' button at the bottom of the screen. Ensure layout and grid precision using a 4-column mobile grid with 16px margins. Negative constraint: Do not use overlapping text, fake dummy text, or unnecessary gradient backgrounds."
For a B2B SaaS Dashboard:
"Act as an enterprise product designer. Generate a mid-fidelity wireframe for a B2B analytics dashboard. The layout must feature a left collapsible sidebar and a main content area with three KPI summary cards at the top, followed by a large data table displaying user metrics. Ensure real UI compliance by using standard table components and logical pagination controls. Negative constraint: No invalid decorative illustrations, no overlapping UI elements, and no centered text alignments in the data table."
For a SaaS Landing Page:
"Act as a conversion-focused web designer. Generate a high-fidelity landing page wireframe for a new productivity application. Include a compelling hero section with a bold headline, a placeholder for an explainer video, a three-column feature highlight section, and a clear pricing tier table. Ensure layout and grid precision using a standard 1440px desktop grid. Negative constraint: No dummy text in headlines, no overlapping background graphics, and avoid overly complex non-standard UI elements."
These templates represent some of the best ai prompts because they leave absolutely nothing to chance. They plug directly into a structured workflow and yield immediate, usable results. Having a reliable free prompt to UI designs readily available means you never have to face a blank, intimidating canvas again.
Part 6: Step-by-step: executing your workflow in Pixso
Understanding the underlying theory is excellent, but executing it flawlessly requires the right environment. Here is a detailed, step-by-step guide to applying your ultimate free prompt to UI designs directly within Pixso, turning text instructions into tangible vector layers.
Step 1: Launch the Workspace. Open your browser or desktop application and log into Pixso. Create a new design file. The interface will feel instantly familiar to anyone who has previously used major vector design tools, ensuring a zero-friction onboarding experience.
Step 2: Activate the AI Assistant. Locate and click the dedicated Pixso AI icon in the top toolbar, or simply right-click anywhere on the blank canvas to summon the AI generation panel.
Step 3: Choose Your Module. Select the specific wireframe or UI design generation module from the menu. This ensures the engine is optimized strictly for interfaces rather than generic, illustrative graphics.
Step 4: Input Your Structured Text. Take one of your meticulously crafted design prompts and paste it directly into the input field. Make sure your text clearly outlines the role, task, and constraints as discussed in our structural framework.
Step 5: Configure Fidelity and Exclusions. Use the plugin's native settings to dictate your desired fidelity level—switching between low, mid, or high depending on your immediate need. If the interface allows for specific exclusion parameters, paste your negative prompts here to prevent visual clutter and layout errors.
Step 6: Generate and Refine. Hit the generate button. Within seconds, Pixso will populate your canvas. Because the result features standard components and native Auto Layout, you can immediately begin dragging, dropping, resizing, and adjusting typography to perfectly match your brand guidelines. You are now actively participating in an iterative workflow, taking the heavy lifting done by the AI and applying your expert designer polish.
Step 7: Collaborate and Hand Off. Once your iteration is complete, utilize Pixso’s real-time collaboration features to invite product managers and stakeholders for feedback. Because the output is built with standard components, generating CSS or inspecting properties for developer handoff is immediate and perfectly accurate.
Conclusion
Mastering the art of text-to-interface generation is no longer optional for modern product designers; it is a fundamental necessity. By leveraging a structured framework, enforcing strict layout constraints, and utilizing precise negative exclusions, you can entirely eliminate the friction of starting a new project. Remember, the true value of these techniques is unlocked only when paired with a platform capable of delivering fully editable, tool-ready outputs. Armed with an optimized free prompt to UI designs and the sheer processing power of Pixso AI, you can transform hours of tedious manual wireframing into a rapid, highly iterative, and deeply creative process. Start experimenting with these formulas today, and watch your entire product design workflow evolve.