Scott
Need only a logo, illustration, icon, or selected Figma frame in Sketch? Exporting the selection as SVG is usually simpler than moving the entire Figma file. This focused guide explains how to convert Figma to Sketch with SVG, what the format preserves, and which layers you should check after import.
When SVG is the right choice
Use SVG when the deliverable is a small set of scalable vector assets. Common examples include a brand mark, an icon family, an illustration, or a static hero graphic. SVG keeps vector paths scalable and is easy to place in a Sketch canvas.
SVG is not a full Figma-to-Sketch migration. It does not carry Figma pages, component relationships, variables, shared libraries, or prototype connections. If you need an editable multi-page design file, use the broader Figma to Sketch conversion guide instead.
Prepare the Figma selection
- Duplicate the source file or record its current version before exporting.
- Select the frame, group, or vector layer that should become the SVG.
- Remove hidden layers and unused effects that should not appear in the asset.
- Check the canvas bounds so the SVG does not include unexpected whitespace.
- Confirm that any included fonts and images are approved for the destination use.
For an icon set, export each icon with a consistent frame and naming pattern. For an illustration, decide whether text should remain editable or be converted to paths. Converting text to paths can improve portability, but it also removes text editing and may increase the number of vector nodes.
Export the frame or layer as SVG
In Figma, use the current export controls for the selected object and choose SVG. Save the file with a name that describes the asset and its revision, such as checkout-empty-state-v2.svg. Do not overwrite the source design with an exported file.
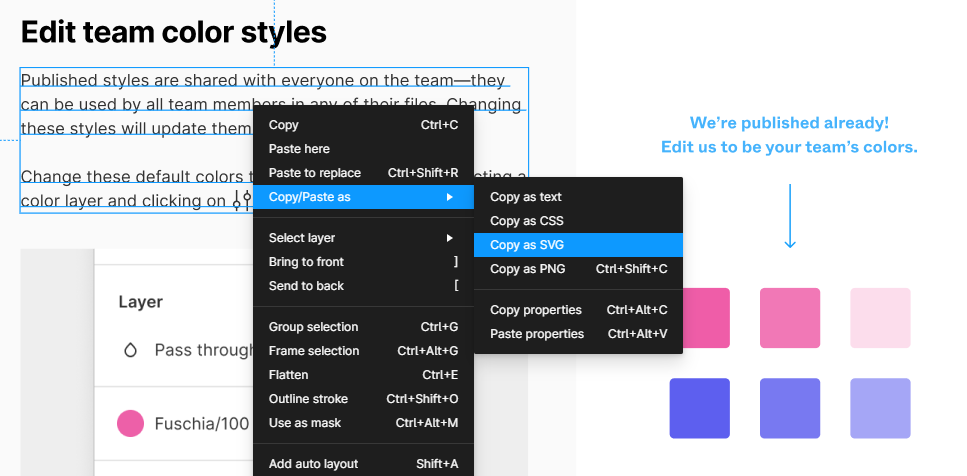
If the asset contains a mask, gradient, blend mode, or embedded image, export a small test first. A successful export dialog does not guarantee that every visual effect will render the same way in Sketch.
Place the SVG in Sketch
- Open the Sketch document that should receive the asset.
- Drag the SVG onto the canvas, or use Sketch's current import command.
- Position the asset at the intended size and compare it with the Figma source.
- Rename the imported group and place it in the correct page or symbol library.
- Save the Sketch document with a versioned file name.
Inspect the imported SVG
Zoom to 100% and compare the SVG with the Figma source. Check the following areas:
- Paths: look for missing shapes, unexpected joins, or clipped edges.
- Text: confirm whether text remains editable, uses the correct font, or was converted to outlines intentionally.
- Colors: compare fills, strokes, opacity, gradients, and blend modes.
- Masks: verify clipping paths and nested masks, especially around rounded images.
- Images: check that embedded or linked raster assets still appear and have enough resolution.
- Bounds: remove accidental whitespace and confirm the asset's export dimensions.
Keep the original SVG beside the Sketch file while reviewing. If the asset will be used repeatedly, document the approved dimensions, color variants, and replacement procedure in the team's asset library.
SVG or PNG: choose the right handoff format
SVG is usually the better choice when the asset needs to scale, change color, or remain editable as vector geometry. PNG is often safer for a finished photographic image, a texture, or a visual effect that does not translate reliably into vector paths. The choice should follow the receiving task, not a blanket preference for one format.
| Need | Prefer | Reason |
|---|---|---|
| Logo or icon at multiple sizes | SVG | Vector paths scale without a fixed pixel grid. |
| Photographic or textured artwork | PNG or another approved raster format | Raster data can preserve detail that should not be rebuilt as paths. |
| Color theming in Sketch | SVG, after checking fills and strokes | Paths can be recolored when the imported structure remains usable. |
| One locked visual with no editing requirement | SVG or PNG based on the source | Choose the smallest reliable asset and document that it is final artwork. |
When a team uses both formats, keep the source selection, export settings, and intended use together in the handoff note. This prevents a developer or designer from treating a preview PNG as the editable master.
Organize the imported asset in Sketch
An SVG can arrive as a group with many paths. Give that group a meaningful name, place it on the correct page, and preserve the original asset name in a note or library description. For an icon set, use one consistent naming pattern such as icon/arrow-left and icon/arrow-right. For an illustration, record the intended frame, color theme, and light or dark background.
Do not ungroup every SVG automatically. Ungroup only when a real edit requires access to individual paths. Excessive ungrouping makes later replacement harder and can create accidental changes to clipping paths, stroke widths, or alignment. If the team needs a reusable symbol, build that symbol deliberately in Sketch after the visual review.
Review the SVG handoff with the team
For a shared project, ask the designer and the Sketch owner to review the same asset version. Record the source Figma link, SVG filename, Sketch filename, export date, reviewer, and known differences. If a visual correction is made in Sketch, decide whether the correction belongs in the source Figma file as well. Otherwise the next export may reintroduce the original problem.
Pixso's collaborative workspace can be useful when the team needs to inspect the source design, collect comments, or compare a revised asset before handoff. Keep the review focused on the selected SVG asset; a full multi-page migration belongs in the main Figma to Sketch guide.
Common SVG conversion problems
Text looks different
Font availability, font weight, line height, letter spacing, and text-to-path decisions can change the result. Install the approved font in the destination environment or ask the designer whether the text should be outlined. Do not silently replace a brand font.
Gradients or shadows change
Compare the gradient stops, opacity, blur, and blend mode. If a visual effect is unsupported or renders differently, simplify it deliberately and record the change rather than presenting the result as identical.
Layers arrive as one group
SVG describes vector content, not the original Figma component model. Ungroup only when the receiving team needs to edit the paths. For reusable UI components, a full editable conversion is usually a better starting point than a flattened SVG.
The asset contains too much whitespace
Return to the Figma selection and check its bounds, invisible layers, and frame size. Export a tighter selection instead of compensating with arbitrary resizing in Sketch.
SVG-to-Sketch checklist
- The exported object and revision are named clearly.
- The SVG opens and can be placed in the current Sketch version.
- Paths, text, masks, colors, effects, and embedded images have been checked.
- Unwanted whitespace and hidden content are removed.
- Any text-to-path or manual visual correction is documented.
- The original Figma source and SVG remain available for comparison.
When to use a full-file conversion instead
Choose a full-file workflow when the Sketch team needs several pages, reusable components, variables, design-system assets, or a complete set of responsive states. SVG is the right answer for a focused asset handoff, not for preserving an entire product file. Start with the full Figma to Sketch methods guide when the scope is larger than a selected frame. If the team is reviewing the source in Pixso first, use the Pixso design workspace as the next product step, then verify the current import and export options in the account.
Convert only what Sketch needs
To convert Figma to Sketch with SVG, export a deliberate selection, place it in Sketch, and inspect the paths, text, effects, masks, and bounds. Keeping this workflow focused makes SVG fast and predictable while leaving full-file migration to a separate process.