Scott
Maps have become a common component of several web and mobile apps. Usually, these maps are put in place to help people get directions, find places, set delivery locations, or even simply explore and find places within a certain location.
A useful map UI helps someone understand where they are, compare relevant places, and confirm the right location. The basemap, location features, and controls need to work together. A parcel pickup-point example below turns those layers into a complete selection flow, including location access being unavailable.
Part 1. Quick Overview of Map UI Design
1.1 What Is Map UI Design
Map UI design is the crafting of an interface that represents geographic information and the controls needed to act on it. When a user requests a ride or highlights a delivery location, the interface connects a place on the map with a decision such as selecting a pickup point.
Using UI design tools, designers can create map screens with varying styles and features. Map templates can help with visual exploration, while the working product still needs a mapping provider, location data, and implemented interactions.
1.2 Map UI Design Vs. Common UI Design

Map UI design shares familiar interface concerns such as readable text, clear controls, and feedback. Its geographic context adds another challenge: a place must stay recognizable as the viewport moves, the zoom changes, or its corresponding details open.
One useful way to organize a map interface is to separate the basemap, task-specific features, and controls. The basemap provides geographic context; features identify relevant places or routes; controls let people search, select, and navigate. Typography and information density determine whether these layers remain understandable together.
Part 2. How to Improve Your Map UI Design
Start by defining what the map helps someone decide. Then choose the geographic context, markers, labels, and controls that support that decision. Check them together at the zoom levels and screen sizes the task requires.
2.1 Basic Elements in Map UI Design
A digital map is built on several elements and generally consists of the following.
-
Basemap layer: The basemap layer forms the primary layer and the background for the map. The choice of this layer is based on the type of data available and the product being designed. The basemap allows for visual depiction of geographic information; it might include geological features, land, and other similar representations.
-
Features layer: It is a way to represent relevant information to the end users. It highlights all the points of significance and all other relevant data, such as buildings, places, boundaries, stores, and streets.
-
Controls and interactions: All the elements allow for control and interaction with the map after visualizations. It could include controls such as selecting a location, tracking, and even seeking directions.
2.2 Basic Principles for Map UI Design
The following principles help keep the map readable and its controls understandable.
-
Contrast: Separate important pins, labels, and controls from the basemap. Check them over the actual streets, parks, and imagery they can overlap, rather than one convenient background. A quiet label plate or marker outline may preserve readability where the map underneath varies.
-
Color spectrum: Select colors for clear roles such as the current location, the selected pickup point, and unavailable points. There is no universal requirement to use 10–12 colors. Keep the palette as small as the information allows, and pair color with a label, shape, or selected marker so meaning survives without hue differences.
-
Visual hierarchy: Map screens contain several kinds of information. Use size, contrast, position, and labeling to emphasize the current task. The selected pickup point should be easier to find than background landmarks. Adjust the visible detail at different zoom levels without making an important selected location disappear without explanation.
-
Information density: Information density depicts the degree and amount of information present on the map for users. It is often brought to light when users zoom in to the maps, so the more a user zooms in on a specific location, the more information pops up. It is crucial to adopt moderation and adequacy in this aspect. Too much information on a single zoom may overwhelm the users, and it is preferable to adopt a progressive disclosure technique where information gradually pops out with each successive zoom.
-
Typography and legibility: Place names must remain readable at the size people actually use. Inspect long names, overlapping labels, character shapes, weight, and spacing over light and dark map areas. DPI describes output density, not a category of more legible fonts. Keep text in the accompanying location card large enough to read without relying on a tiny map label.
2.3. Put the Layers Together: Choose a Pickup Point
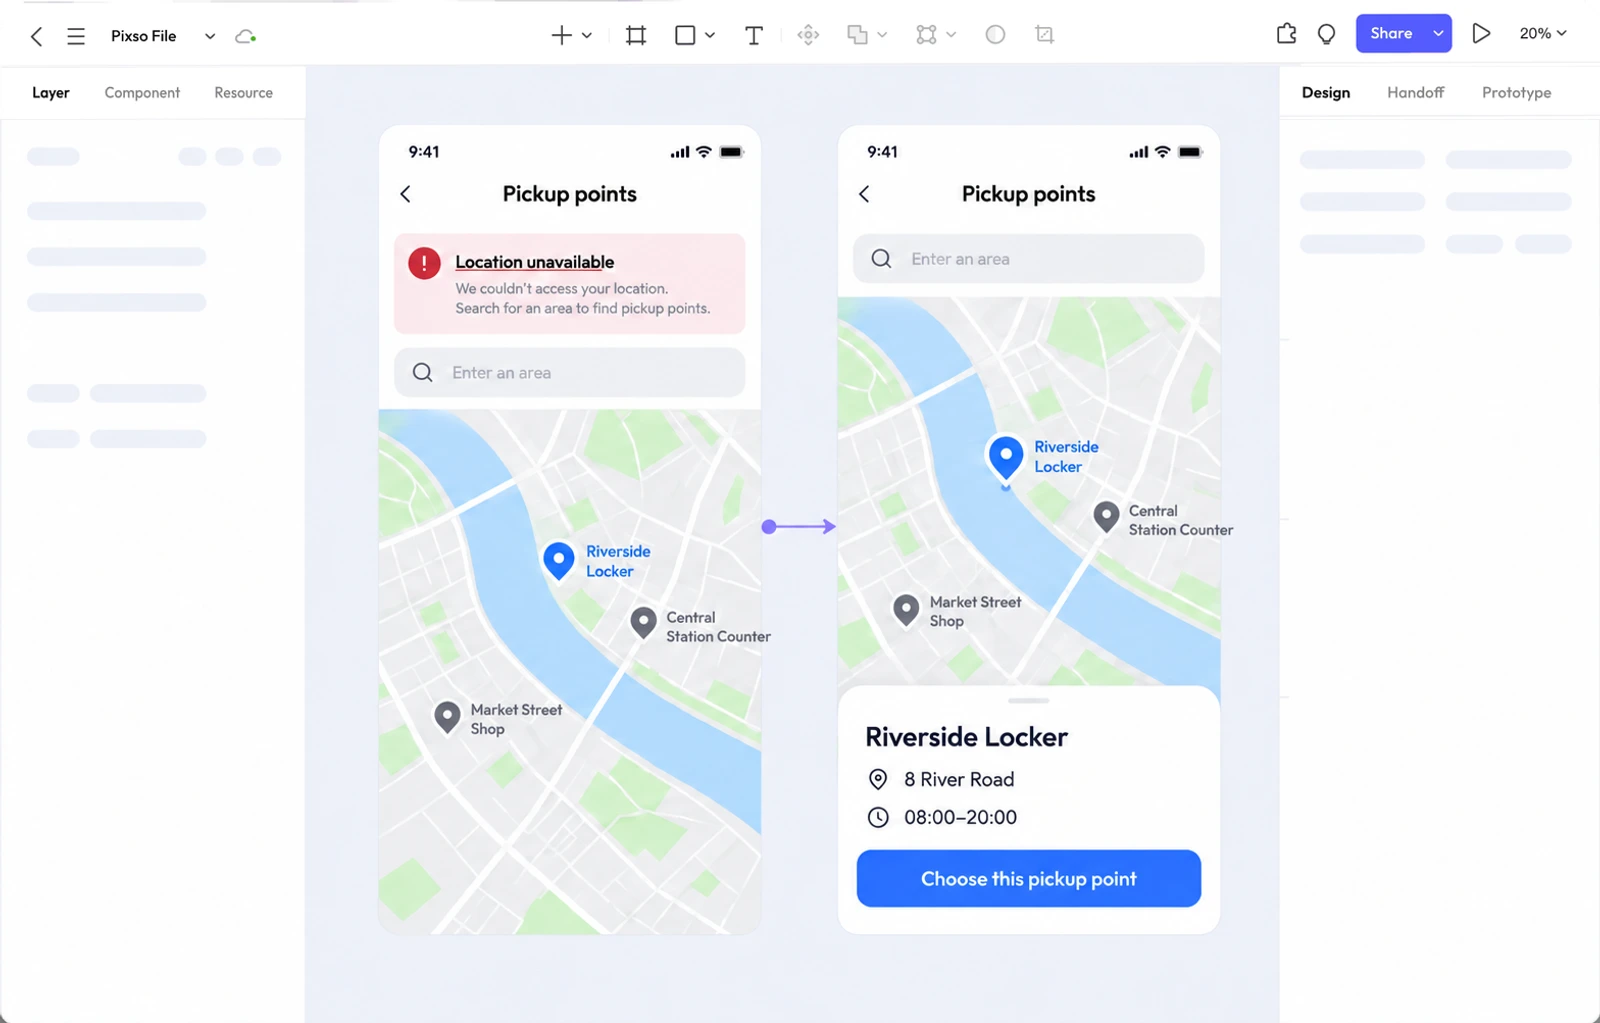
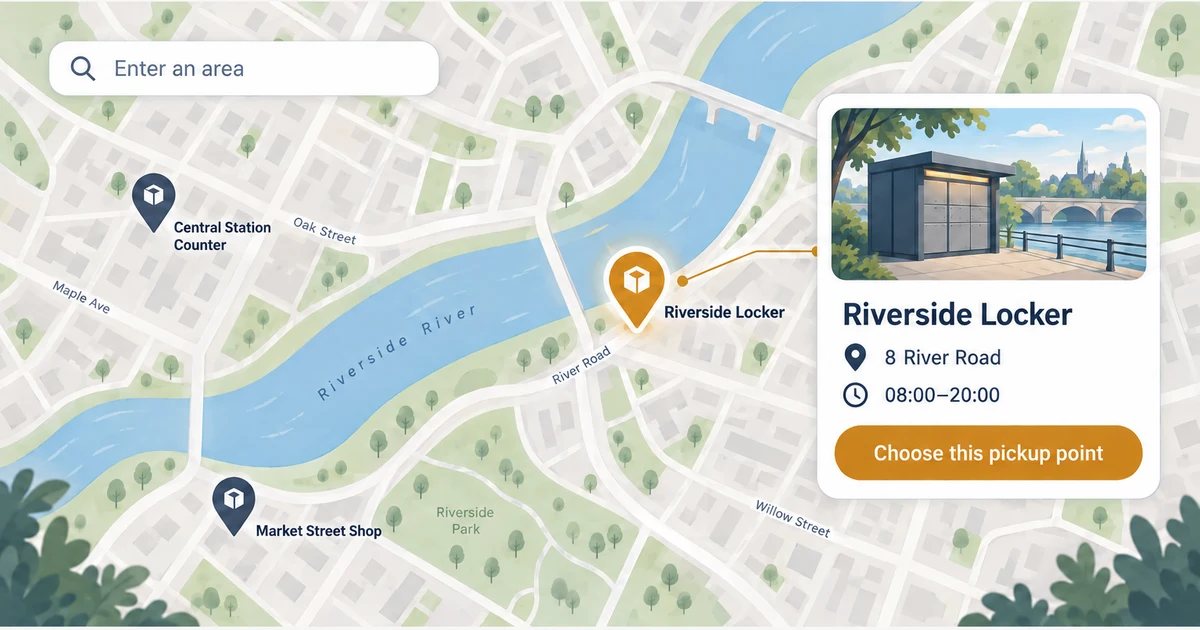
Imagine a parcel service offering three fictional pickup locations: Riverside Locker, Central Station Counter, and Market Street Shop. The customer needs a location they can use after work. Keep its name, address, collection hours, and service availability in the list and detail card; geographic proximity alone cannot answer that choice. In this example, Riverside Locker is at 8 River Road, with collection hours of 08:00–20:00.
Start with an address or area search and an optional “Use my location” action. Ask for location access when that action is chosen. The W3C Geolocation specification distinguishes denied access, unavailable position, and timeout. Match the recovery message to what the service actually knows: “Location access is unavailable. Enter an area to find pickup points” keeps the task available without insisting on permission.
| Moment | Map | List or card | Next action |
|---|---|---|---|
| Results loaded | Show the same pickup points as the list. | Names, addresses, collection hours and availability. | Compare or select a point. |
| Riverside selected | Distinct selected marker. | Riverside details and selected state. | Choose this pickup point. |
| Map moved | New area is visible. | Keep the current selection identifiable. | Search this area when requested. |
| No eligible points | Preserve the searched area. | Explain that no pickup points meet the current requirements. | Change area or remove a relevant filter. |
| Availability changed | Show the point as unavailable. | Explain why confirmation cannot complete. | Choose another available point. |
Selecting Riverside in the list should select Riverside on the map; selecting its marker should open the same details. Use a shared identifier when describing this relationship to developers. The customer's current location and chosen pickup point need distinct symbols and labels because they answer different questions.
Several nearby points may overlap when zoomed out. Google Maps' clustering example groups nearby markers and expands them as the map zooms in. If using this pattern, distinguish a cluster count from an individually selected point. A cluster labelled “3” must not look like a place that can receive the parcel. Let the customer reach the individual locations through the list as well.
Decide whether panning automatically refreshes results or reveals a “Search this area” control. For this exercise, use the explicit control so moving the map does not replace the list mid-comparison. Keep the previously chosen point in a visible selection card if it is outside the new viewport, with an action to show it again.
Provide a keyboard path through the search, result list, location details, and confirmation. The map provider's own controls need implementation review: Google's accessible-marker guidance demonstrates focusable markers, descriptive text, and keyboard operation. A polished static pin is not evidence that those behaviors exist.
At confirmation, repeat the pickup point's full name and address. Check availability before committing to it if the service requires current capacity. A loading map, a failed data request, and a successful search with no results need different messages; otherwise the customer cannot tell whether to wait, retry, or choose another area.
2.4. Design and Prototype the Map Flow in Pixso
Use Pixso’s prototyping workflow to connect the map overview, selected point, location-unavailable fallback, and confirmation frames. The canvas lets the team agree on the selection behavior before implementing the map service.
Pixso Tools for the Map Task
Reusable interface elements: Create a pickup-point marker and matching result card, then reuse them across normal, selected, and unavailable states. Use consistent text and color styles so the card and marker keep the same meaning across frames.
Team collaboration: Review the map and list together. Leave comments on the selected state, collection-hours information, and recovery paths. A teammate should be able to identify the chosen location without relying on a designer to explain the screen.
Handoff: Annotate which result the marker represents, when the list refreshes, and what happens if the location becomes unavailable. These decisions accompany the visual design; exported artwork alone cannot implement a mapping service.
Try the prototype with a customer task: choose an available pickup point for collection after work without sharing your current location. Watch whether the participant can compare the options, keep track of the selected point after panning, and recognize the final address. Revise the point where that understanding breaks.