Scott
You find a photo that fits your design vision perfectly, but a few distracting details spoil the composition: a stray mug on a table, glasses on a subject, or a smartphone held in hand. In traditional workflows, fixing these details meant creating meticulous selection masks and manually cloning surrounding textures. Today, you can perform targeted edits by simply describing the changes you want in plain language.
In this guide, we will explore how to remove or replace specific visual elements while preserving the framing, lighting, and overall mood of your original asset. Using real before and after examples in Pixso, we will walk through practical use cases, step by step instructions, and prompt writing tips for seamless visual editing.
🤔 Can I Edit Only a Specific Region of an Image?
Yes. Modern ai image editing tools allow you to select a source image and specify exactly which region you want to alter. By using natural language prompts like "remove the clutter from the tabletop" or "change clear glasses to black sunglasses," the AI analyzes surrounding lighting, perspective, and background textures to reconstruct the target area naturally.
Part 1. What Is Image Inpainting?
Image inpainting, often referred to as generative fill or targeted region editing, is the process of removing or replacing a designated area within a photo without regenerating the entire image.
When you describe a target modification, the AI evaluates not only the selected object but also the surrounding colors, light diffusion, shadow direction, and spatial perspective. It then generates new pixels that blend smoothly into the existing photograph.
Global Edits vs. Image Inpainting
Understanding the difference between global adjustments and region specific editing helps you choose the right approach for your assets:
Global Image Edits
Alters overall color temperature, lighting, background scenes, or artistic styles across the entire frame. This is ideal when you want to establish a completely new aesthetic tone for an image.
Image Inpainting
Modifies only a selected object or boundary. This approach preserves core subjects, backgrounds, and framing, making it ideal for minor corrections or targeted asset variations.
If your goal is to erase a minor prop or swap a subject's accessory, using ai inpainting is significantly more efficient than regenerating an entire photo from scratch.
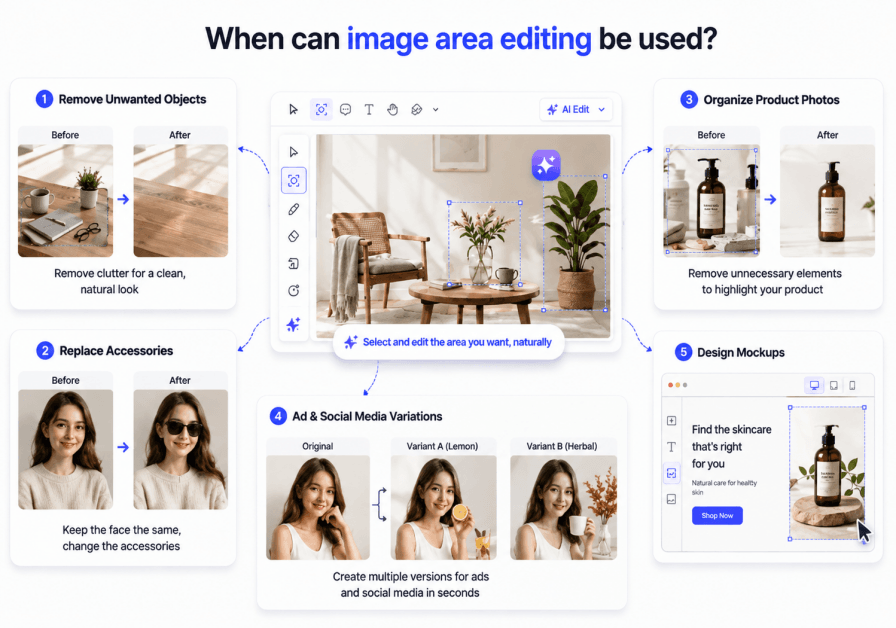
Part 2. Practical Use Cases for Image Inpainting
Targeted image editing is an essential technique for e-commerce, advertising, social media campaigns, and UI design prototyping, where visual consistency across visual assets is critical.
1. Erasing Unwanted Visual Clutter
Quickly remove distracting props from tabletop scenes, such as magazines, remote controls, or stray coffee cups—or erase background pedestrians from outdoor shots. The AI fills the erased space using surrounding floor, wall, or table surface textures.
2. Swapping Fashion Accessories
Swap clear eyeglasses for sunglasses, or test different hats, jewelry, and watches on a model. This allows teams to compare visual options without scheduling additional photo shoots.
3. Cleaning Up Product Photography
Clear away unwanted packaging materials from product shots, change prop colors, or erase surface blemishes. When modifying precise product features or brand logos, always zoom in to inspect the final output.
4. Generating Ad Campaign Variations
By modifying a single accessory or prop within a hero image, design teams can quickly produce multiple ad variations. Preserving the subject and background framing ensures brand continuity across campaign iterations.
5. Editing Visuals Directly Within UI Layouts
Exporting visual assets to external photo editors creates unnecessary friction during the UI design process. In Pixso, you can edit images with AI capabilities directly on your design canvas, updating graphics alongside buttons, typography, and layout components.
Part 3. Image Inpainting Examples in Pixso
Pixso is a collaborative online UI/UX design platform that combines design tools with AI capabilities. By describing desired modifications in the AI prompt bar, you can erase unwanted elements or swap visual details seamlessly on your workspace.
Example 1. Removing Tabletop Props
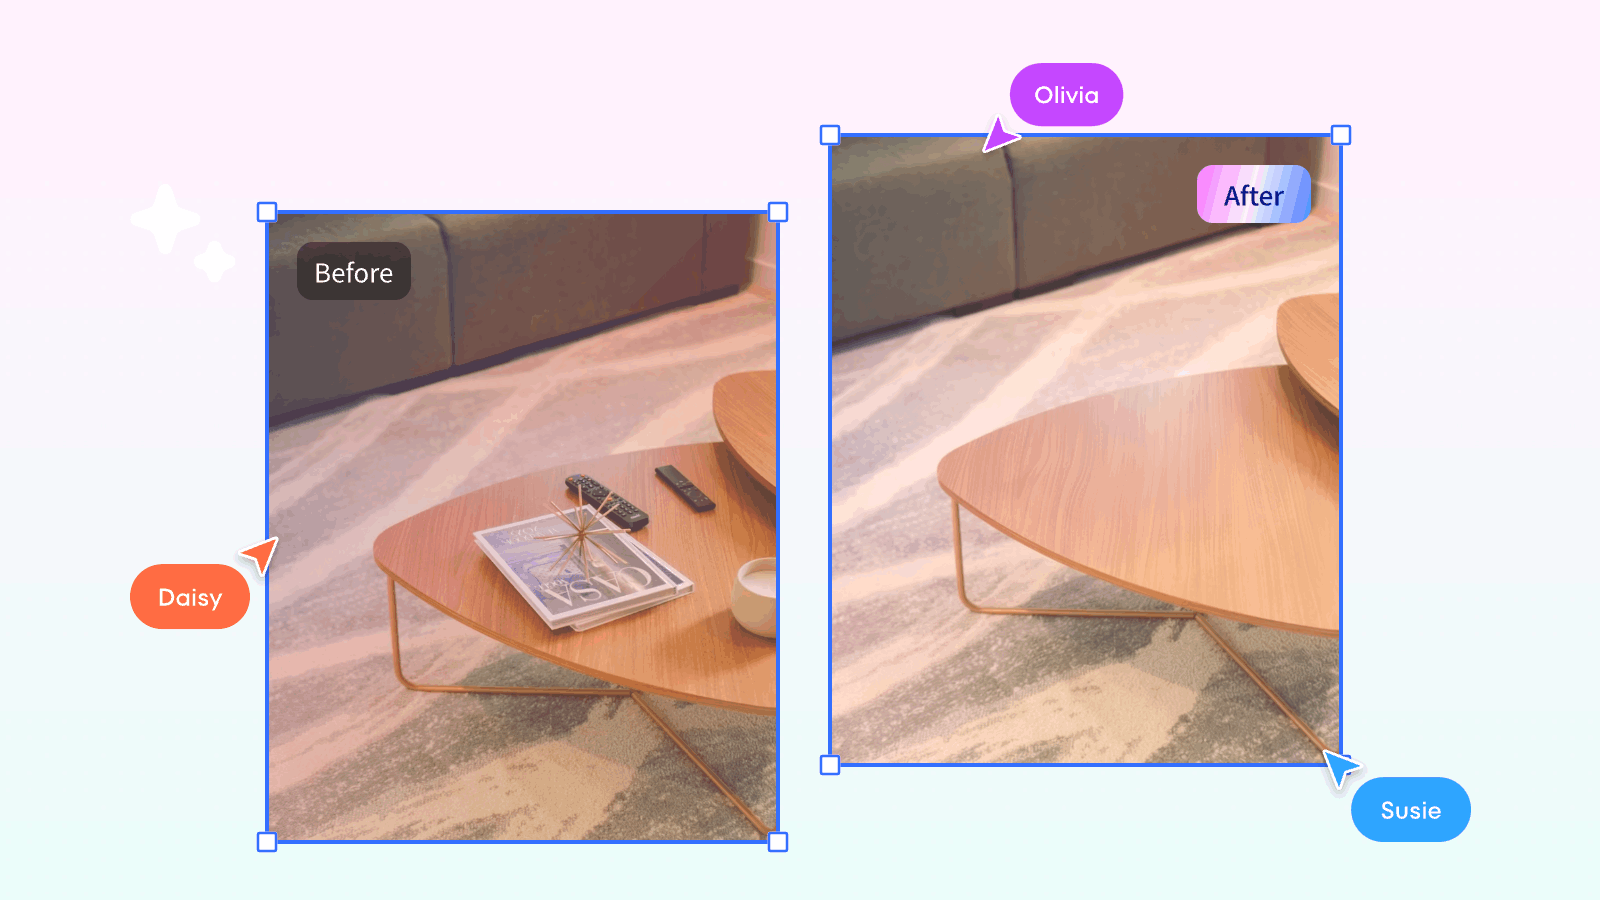
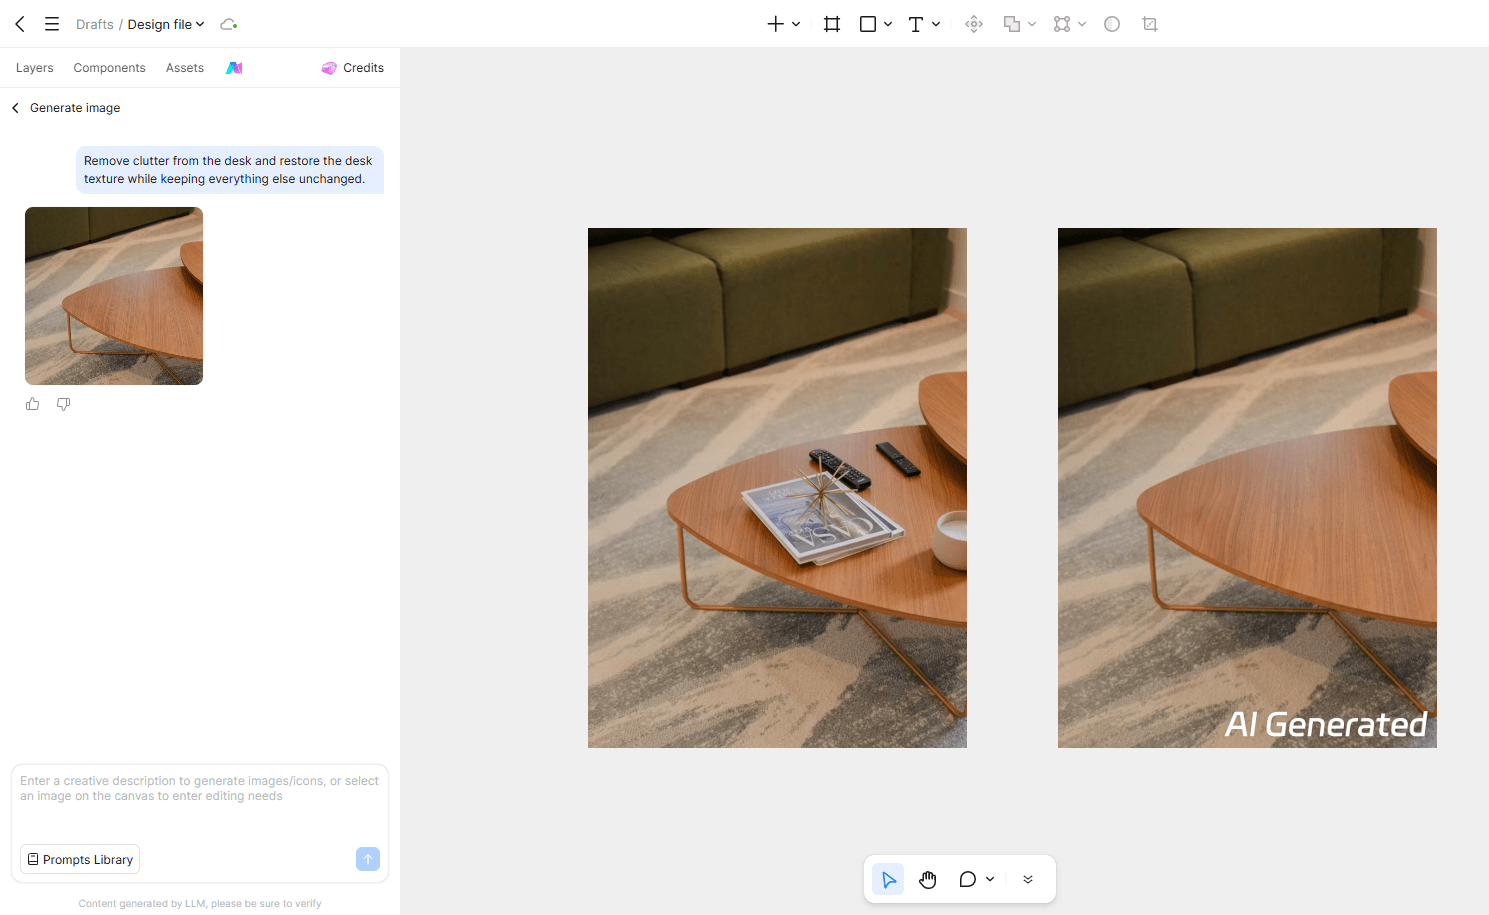
In this example, the sofa, rug, and overall camera framing remain identical before and after editing. The original image features magazines and small props cluttering the wooden table. After editing, those objects disappear, and the natural wood grain surface underneath is completely restored.
This workflow is ideal for interior design, real estate, and hospitality visuals where clutter free spaces look more appealing.
Sample Prompt:
"Remove all magazines and small props from the tabletop. Preserve the sofa, rug, and table structure, and fill the emptied surface with matching wood grain texture and natural lighting."
Example 2. Swapping Clear Glasses for Sunglasses
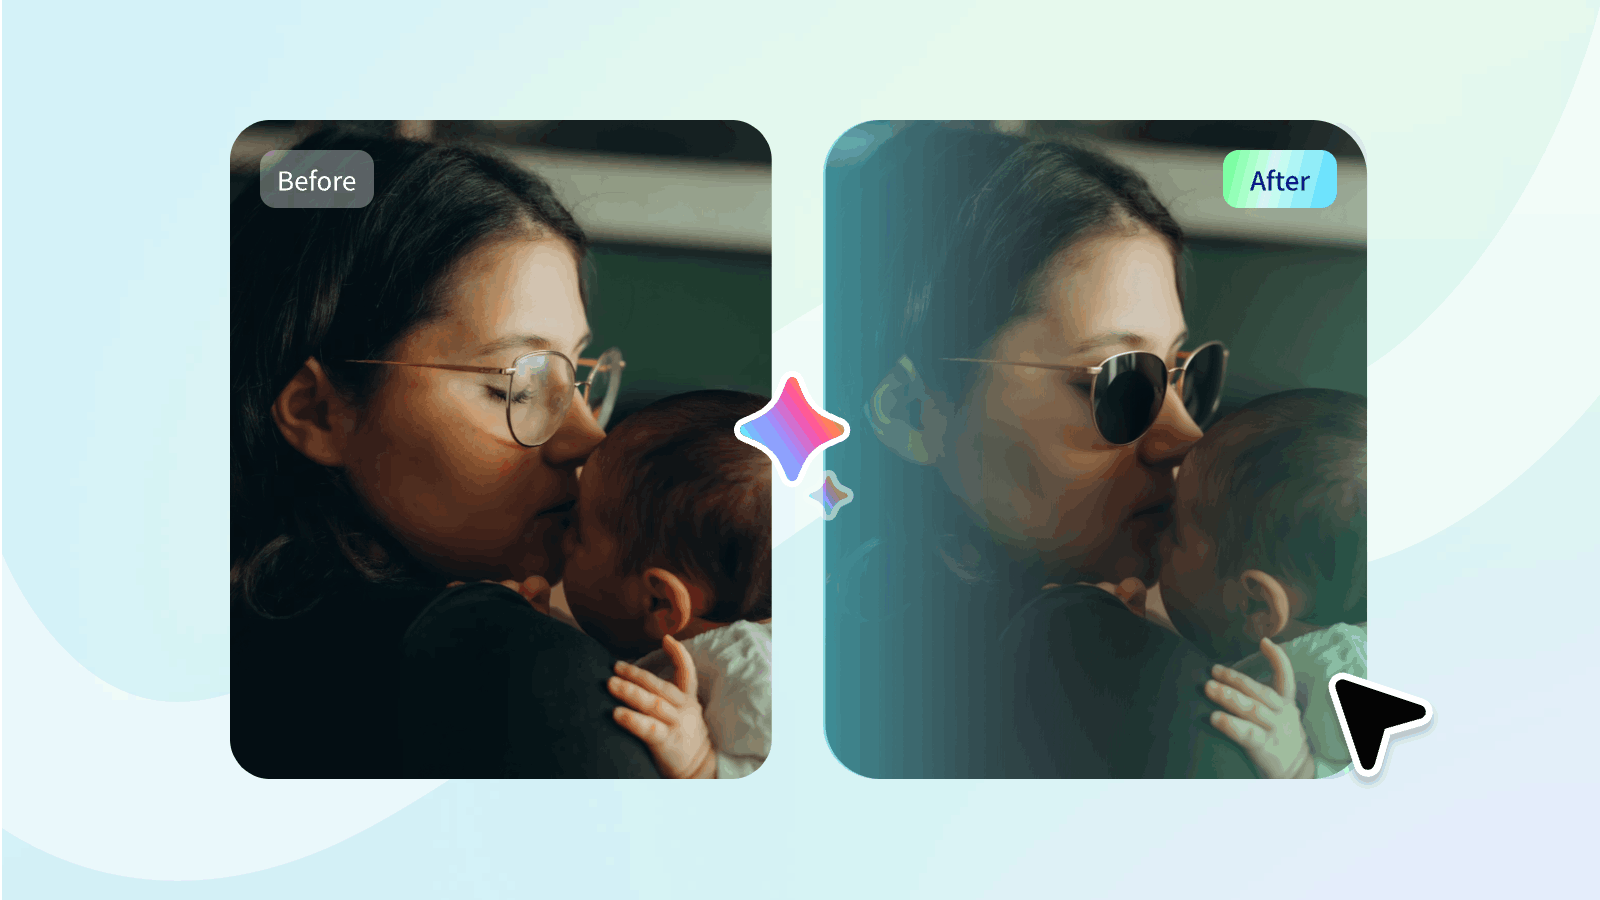
In this second example, a subject holding a child retains their facial features, posture, apparel, and background. The clear eyeglasses are replaced with black sunglasses. Rather than simply darkening the lenses, the AI adjusts lens curvature and frame angles to match the subject's head position.
Using region editing allows design teams to evaluate accessory options while maintaining the authentic mood of a photo shoot.
Sample Prompt:
"Replace the clear eyeglasses worn by the subject with black oval sunglasses. Keep the face, hair, posture, skin tone, and child unchanged, and render natural lighting reflections on the sunglasses frames."
Example 3. Erasing Handheld Devices
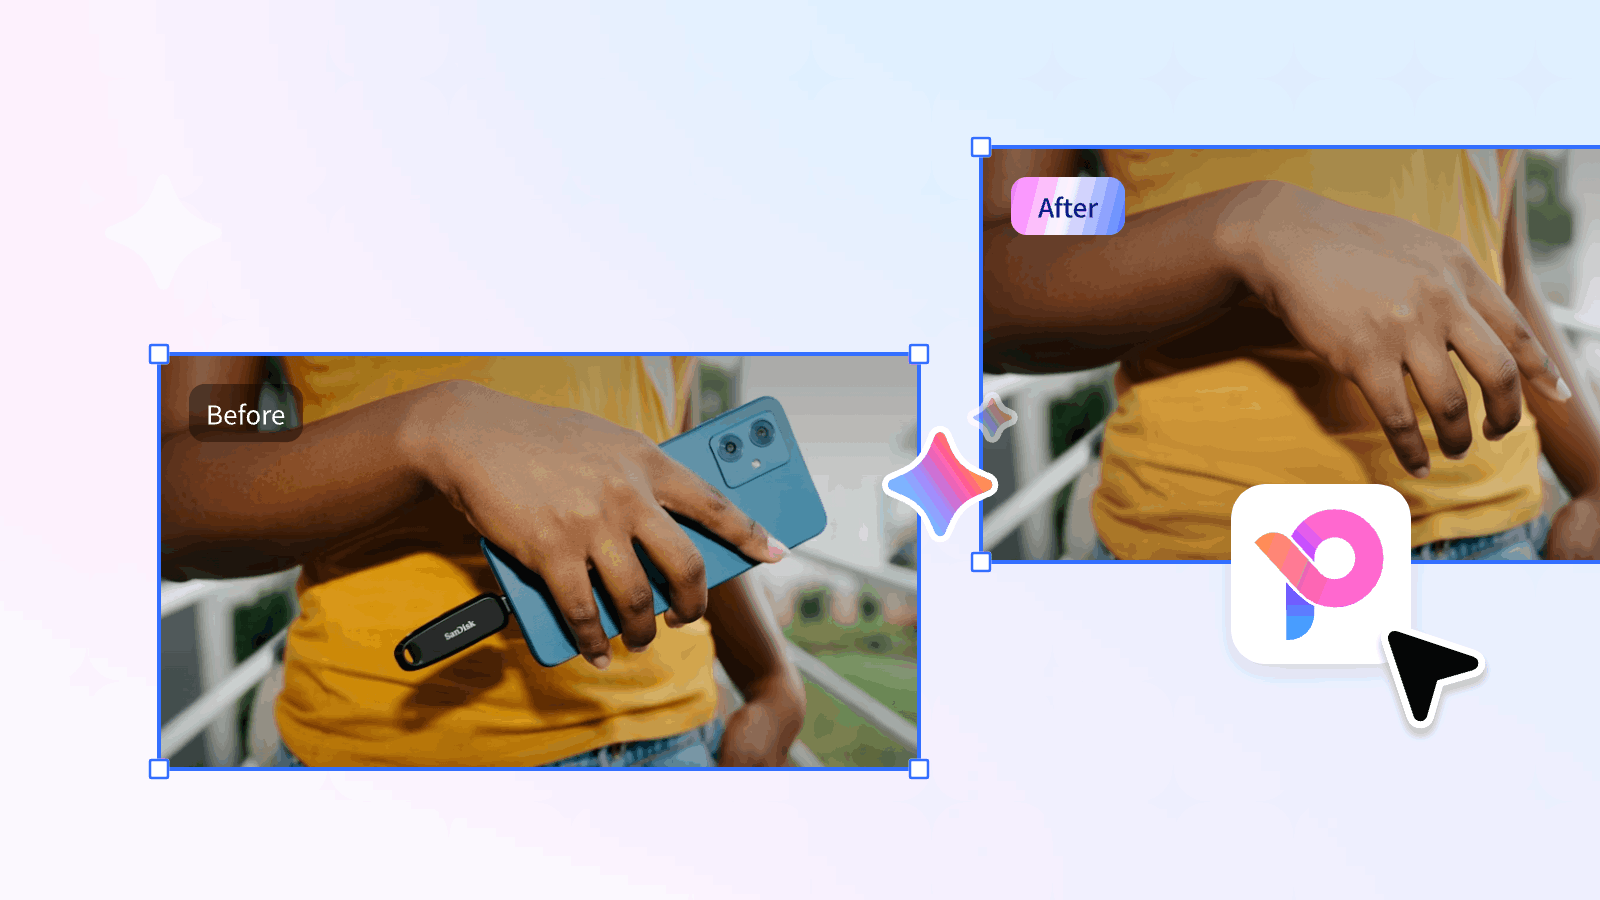
In this example, a subject holds a smartphone and a small electronic device. After editing, both objects are erased while the arm, yellow t-shirt, and background remain unchanged. The fingers that were previously obscured by the devices are reconstructed naturally.
Because hands feature complex joint structures, always review reconstructed fingers carefully after erasing handheld objects.
Sample Prompt:
"Remove the blue smartphone and black device held in the hand. Keep the arm and hand position intact, and reconstruct the missing fingers naturally. Do not alter the yellow t-shirt, skin tone, or background."
Part 4. How to Edit Image Regions in Pixso
You can perform image modifications on standalone photo files or on images embedded within active UI design layouts in Pixso.

Step 1. Open Your Pixso Canvas
Log into Pixso and create a new design file, or open an existing design layout containing the image you want to modify.
Step 2. Select Your Visual Asset
Import an image onto your workspace, or select a photo frame already placed within an app UI, landing page, or ad banner layout.
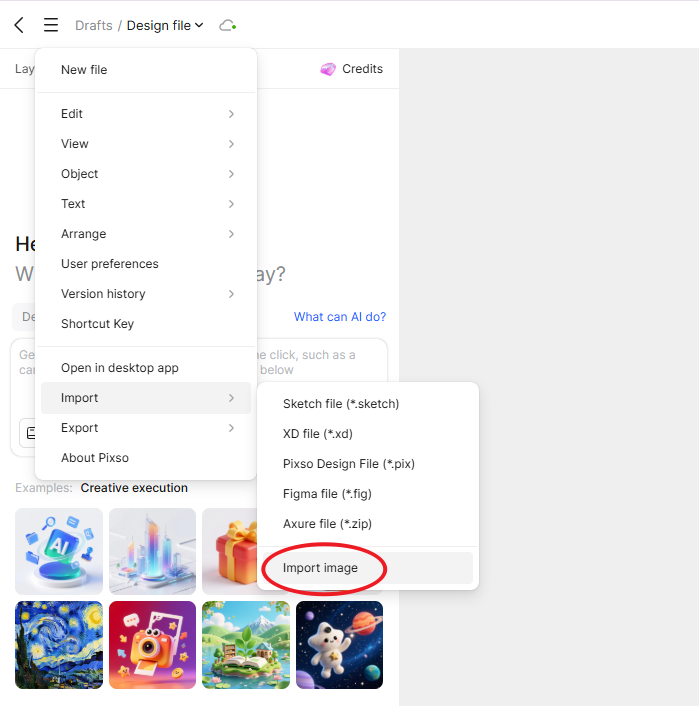
Step 3. Launch AI Image Mode
Navigate to the left toolbar, select AI tools, and switch to Image Mode. Double click the target image on your canvas so the AI identifies the active layer.
Step 4. Define Your Targeted Edits
Enter specific prompt instructions into the AI prompt window. While simple prompts like "erase the phone" work, defining both what to change and what to keep yields cleaner results:
- Target Object: Tabletop clutter, eyeglasses, or handheld devices
- Editing Action: Erase, replace, change color, or adjust form
- Elements to Retain: Facial features, posture, lighting, framing, and background
- Contextual Blending: Shadow direction, surface texture, and perspective
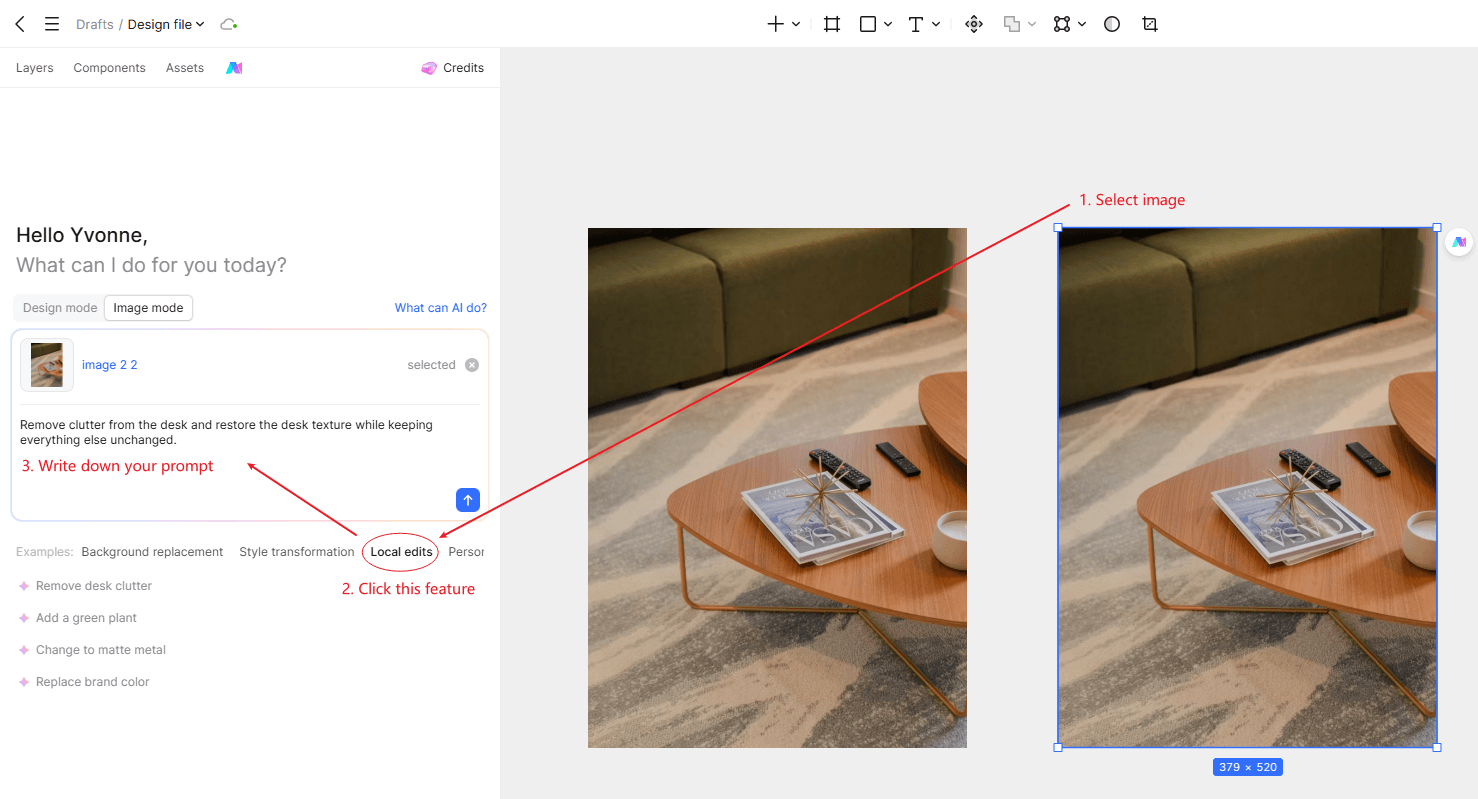
Step 5. Inspect and Compare Outputs
Once generated, place the output alongside the original asset to review changes. Zoom in on areas prone to distortion, such as fingers, facial contours, product edges, or straight background lines.
If the output needs refinement, provide specific follow up prompts rather than rewriting your entire instruction (e.g., "ensure all five fingers are clearly defined with natural hand geometry").
Step 6. Finalize Your Design Layout
Position the updated graphic back into your Pixso artboard. Adjust sizing, layer placement, and surrounding UI components—such as headlines, buttons, and card frames—to complete your graphic layout.
Part 5. Writing Effective Inpainting Prompts
Writing clear prompts is essential for achieving predictable results with an AI image editor. Combining target modifications with contextual preservation guarantees seamless edits.
Basic Prompt Formula
"Modify [Target Object] by [Erasing / Replacing / Changing Color]. Keep [Essential Elements to Preserve] unchanged, and ensure the modified region blends naturally with surrounding [Texture / Lighting / Shadows / Perspective]."
Scenario Prompt Examples
Erasing Unwanted Objects:
"Remove the coffee cup and remote control from the desk. Keep the desk placement unchanged, and restore the missing surface area using matching wood grain textures."
Swapping Accessories:
"Replace the clear eyeglasses with thin black framed sunglasses. Maintain facial structure, hair, and expression, applying natural shadows along the bridge of the nose."
Changing Garment Colors:
"Change the subject's shirt color to navy blue. Retain all fabric folds, material textures, skin tones, and background details."
Erasing Handheld Objects:
"Remove the smartphone held in the hand. Keep the wrist and arm position intact, reconstructing covered fingers with natural anatomy and skin tone."
Replacing Product Components:
"Change the handbag handle to black leather. Maintain the bag shape, logo, surface texture, and background lighting."
Best Practices for Troubleshooting Inpainting Prompts
- Focus on one visual region at a time rather than requesting multiple complex edits at once.
- Mention specific environmental cues like shadows, highlights, and surface grain instead of generic terms like "make it look natural."
- Clearly list key elements that must remain untouched (e.g., faces, corporate logos, core product shapes).
- Always zoom in to evaluate complex areas like hands, eyes, and geometric outlines.
💡 Pro Tip:
Need to improve image clarity or fix soft focus before making targeted region edits? Explore our guide on upscaling assets:
🔗 [NEW] How to unblur images & sharpen portrait photos with AI
FAQ
Q1. Can I edit specific parts of an image without altering the rest of the photo?
Yes. Using targeted image inpainting allows you to specify exact objects or regions to erase or replace while leaving surrounding subjects, lighting, and backgrounds intact.
Q2. How well can AI remove objects from image files cleanly?
AI evaluates surrounding textures, lighting, and spatial perspective to fill in erased areas smoothly. If erased objects obscure complex regions like hands or faces, review the reconstructed area closely to verify anatomical accuracy.
Q3. Will unedited regions of my image change during inpainting?
Surrounding pixels near the edit boundary may adjust slightly to ensure lighting and texture continuity. Stating explicit preservation rules in your prompt minimizes unwanted shifts across the rest of the image.
Q4. Do I need an existing UI layout to edit photos in Pixso?
No. You can import standalone image files directly onto an empty Pixso canvas and apply AI editing features immediately.
Q5. What types of photos work best for targeted region editing?
Photos with clear subject boundaries, consistent lighting, and high source resolution yield the best results. Images with heavy blur or extreme noise can make precise region editing more challenging.
Q6. What makes Pixso one of the best AI photo editing tools for 2026 for product designers?
Pixso combines generative image editing, region inpainting, and vector UI design into a single collaborative workspace. Designers can edit photos, refine UI components, and build prototypes without switching between separate software platforms.
Conclusion
Targeted region editing eliminates the need to reshoot photos or perform tedious manual masking in traditional photo editing software. Whether you need to remove clutter from a tabletop, swap accessories on a model, or erase devices from hands, AI inpainting streamlines visual asset creation.
By using Pixso, you can perform targeted photo edits, compare visual iterations, and build complete user interfaces on a single collaborative canvas. Explore Pixso AI today to streamline your asset editing and UI design workflows.