Scott
A polished interface requires more than attractive visual styling. It must organize realistic content, support distinct user journeys, adapt across viewport sizes, and maintain clear structural hierarchy for engineering implementation.
Within Paico AI, designers can select Claude Sonnet 4.6 PRO directly from the in-app Model type selector to generate responsive web interfaces, interactive applications, and component prototypes. Labeled in the selector as a higher-credit option for "superior quality, best for refined designs", it is intended for complex, multi-module interfaces that require structured layout organization and comprehensive state coverage.
Image source: anthropic.com
Part 1: Why Claude Sonnet 4.6 Fits Detailed UI Tasks
Anthropic released Claude Sonnet 4.6 with benchmark improvements in long-context reasoning, coding, instruction following, and visual design analysis. These strengths are particularly relevant for interface screens that require dense data layouts, multi-step configuration logic, or interdependent form fields.
Paico bridges the gap between raw text-based AI models and practical product design by rendering generative outputs directly into editable, responsive layouts in React or HTML:
- Positioning in Paico: In the workspace selector, Claude Sonnet 4.6 is designated as the premium model for refined designs, contrasting with Qwen-3.7 Plus, which is positioned for lower-credit, broad concept exploration.
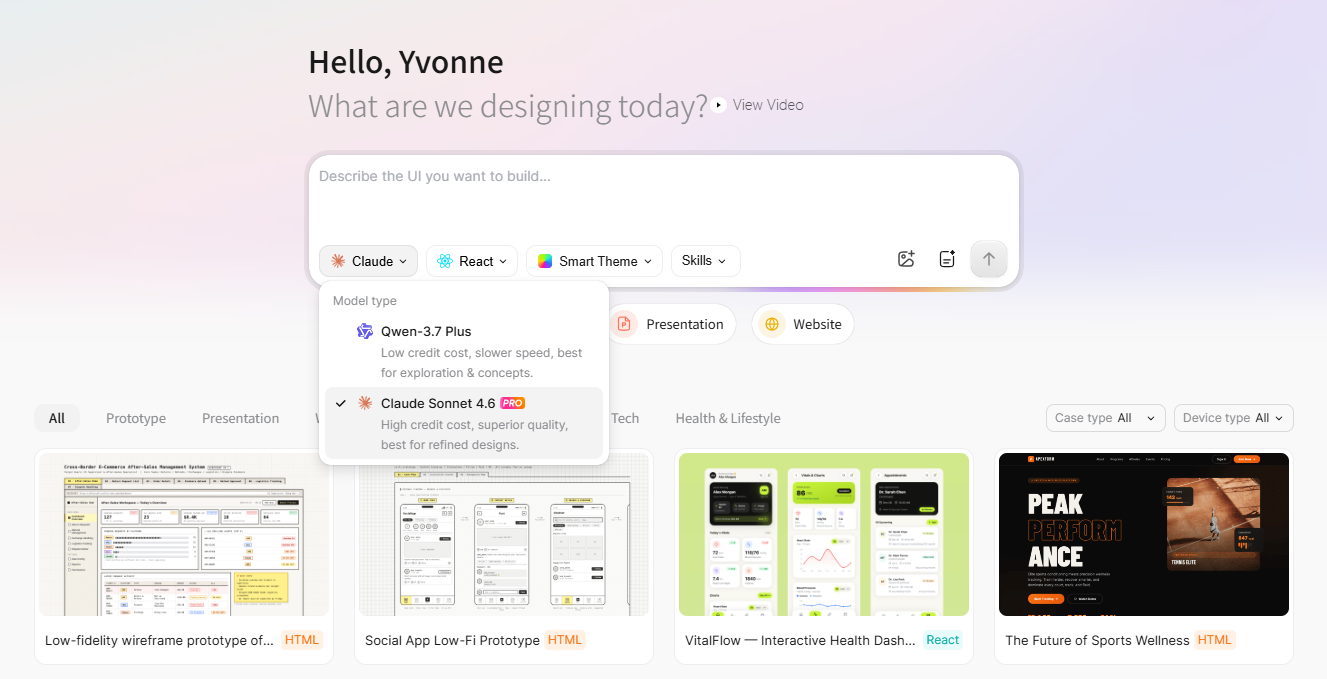
- Integrated Environment: Rather than generating isolated code snippets in an external chat window, Paico embeds the model into an end-to-end workflow featuring framework selection (React/HTML), Smart Themes, component library presets, reference image guidance, Requirements Planning, responsive previewing, and version tracking.
Part 2: Define Quality Criteria Before You Generate
A visually complete design is not automatically functional. High-impact UI balances information architecture, interaction flow, visual hierarchy, responsive reflow, and technical feasibility.
Before opening the prompt modal, establish specific evaluation criteria for your screen:
Quality Evaluation Framework
| Quality Dimension | What Claude Sonnet 4.6 Can Help Organize | What the Product Team Must Validate |
| Information Architecture | Groups related content blocks, data tables, and navigation menus into a coherent layout | Verify that module placement aligns with actual user workflow priorities |
| Interaction & States | Establishes visual placeholders for active selections, filters, and alert banners | Ensure critical loading skeletons, empty data states, and error recovery paths exist |
| Visual Hierarchy | Creates distinct typographic emphasis across page titles, metric cards, and controls | Check that text-to-background contrast satisfies readability standards |
| Responsive Structure | Formulates grid structures for desktop, tablet, and mobile breakpoints | Confirm that multi-column tables and card grids stack logically on small screens |
| Technical Baseline | Generates structural components aligned with chosen frameworks (React/HTML) | Review DOM semantics, component boundaries, and CSS token reusability |
Practical Briefing Habit: Clearly define the user role, primary objective, and core operational scenario before generating: "A regional fleet manager needs to identify delayed delivery routes and assign backup drivers before the morning shift dispatch." Every module on the screen should serve that primary objective.
Part 3: How to Select Claude Sonnet 4.6 in Paico AI
Paico integrates model and framework controls directly into its primary prompt frame on the homepage:
- Sign In: Navigate to Paico and access your design workspace.
- Access the Prompt Field: Click into the main input bar labeled "Describe the UI you want to build...".
- Open the Model Selector: Click the model dropdown button (displaying the active model, e.g., Claude v) to open the Model type popover.
- Select Claude Sonnet 4.6 PRO: Choose Claude Sonnet 4.6 (marked with the pink PRO badge and subtext: "High credit cost, superior quality, best for refined designs").
- Choose Output Framework: Select React for component-driven interactive applications, or HTML for rapid static previews.
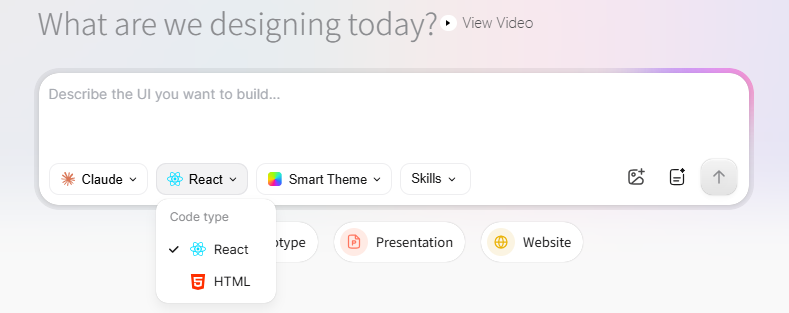
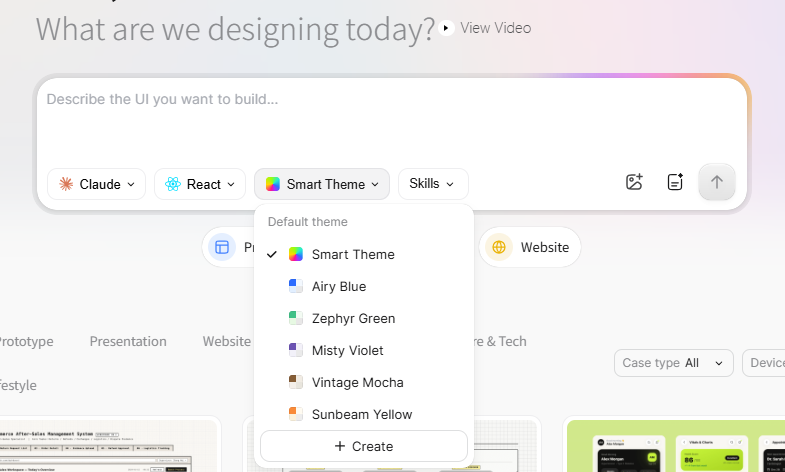
- Configure Styling & Skills: Click Smart Theme to select a coordinated color palette, and open Skills if your screen requires specialized domain formatting (such as complex data visualization or e-commerce flows).
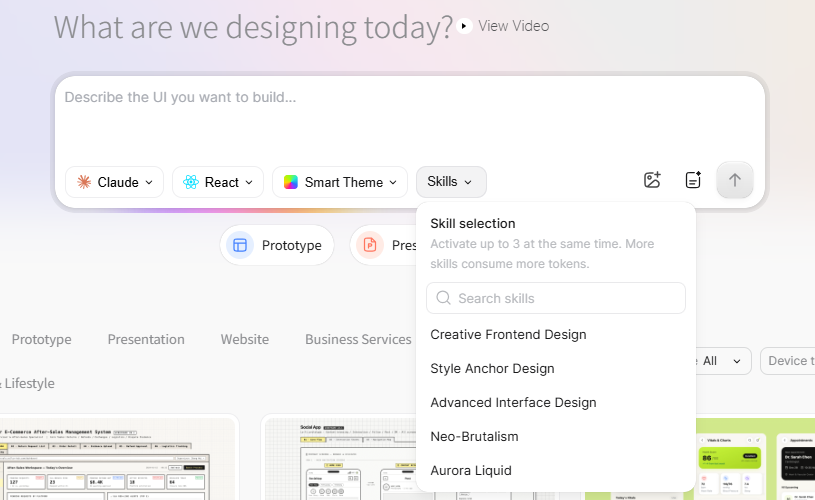
- Attach Requirements or Assets: Use the icons beside the prompt to attach an authorized reference image or launch the Requirements Plan editor to refine your feature scope.
- Submit & Preview: Click the upward arrow to generate. Review the rendered layout in the interactive preview canvas.
Part 4: Writing Prompts for Multi-Module Interfaces
Vague prompts like "build a modern dashboard" leave structural hierarchy, content relationships, and component states unguided. Effective Paico prompts function like concise engineering briefs across seven core dimensions:
- Persona & Context: Target user role and business environment.
- Core Job: The primary task the user must accomplish on this screen.
- Structural Modules: Required navigation, KPI rows, main tables, and side panels.
- Content & Data: Realistic metric names, data column titles, and status tags (avoid generic placeholder text).
- Behavior & Filters: Search inputs, date-range selectors, and interactive tabs.
- Edge States: Explicit requirements for empty data states, loading placeholders, and error banners.
- Visual Guidelines: Enterprise density, 8px spacing increments, and accessible color pairing.
Practical Sample Prompt:
"Design a desktop subscription-health operations dashboard for a B2B SaaS account manager. Include a collapsible left navigation, an urgent alerts banner for failed renewals, a top metric row (Active Accounts, Churn Risk MRR, Net Retention Rate, Renewal Pipeline), a filterable customer accounts table with status badges (Healthy, At-Risk, Churned), and a slide-over drawer showing customer usage history. Provide visual treatments for loading, empty search results, and overdue account states. Use an enterprise slate palette, high-contrast accessible indicators, compact cards, and consistent 8px grid padding. Generate the interface in React with modular components."
This prompt provides Claude with explicit structural relationships to resolve.
To iterate, select a specific child module and prompt for a targeted adjustment:
"Keep the top metrics and navigation unchanged; update the customer accounts table to include an inline action menu with options for 'Schedule Review' and 'Pause Account', and add an amber warning banner for expiring contracts."
Part 5: Configuring Paico Settings Before Generating
Configuring your technical parameters before submitting a prompt ensures the generated layout matches your downstream workflow:
Key Paico Configuration Controls
| Configuration Control | Optimal Application Scenario | Important Practical Considerations |
| React Framework | Applications requiring reusable component trees and stateful tabs | Review component boundaries and prop structures during code inspection |
| HTML Framework | Rapid landing page mockups, static editorial layouts, and client presentations | Best for quick visual alignment; production interactions must be added later |
| Preset Component Libraries | Aligning output with industry standards (shadcn/ui, Ant Design, Material UI) | Confirm that your engineering team uses the selected component library |
| Custom Design Systems | Projects requiring strict brand adherence | Define precise hexadecimal tokens, typography scales, and corner radiuses |
| Skills | Specialized domain tasks (e.g., healthcare data, financial charts) | Activate only skills directly relevant to the current screen challenge |
| Reference Images | Guiding color harmony, spatial balance, or card density | Use for visual composition cues; avoid copying third-party proprietary designs |
| Requirements Plan | Complex briefs requiring scope definition prior to screen generation | Review and prune unsupported scope before spending AI credits |
Pro Tip: Use the Requirements Plan feature to validate user journeys and required data columns before triggering UI rendering. Pruning unneeded features in the plan prevents burning credits on bloated layouts.
Part 6: Structured Exploration and Responsive Reflow
Rather than generating completely random layout variations, structure your design explorations around clear hypotheses:
- Hypothesis A (Metric-Led): Key performance indicators and urgent exception alerts dominate the upper fold.
- Hypothesis B (Action-Led): Pending operational tasks, approval queues, and quick-action shortcuts take primary visual weight.
- Hypothesis C (Table-Led): A dense, deeply filterable data grid occupies the central viewport for rapid record scanning.
Managing Variations and History
Paico saves generated outputs in your project history, allowing users to revisit previous iterations through version cards. Use multi-turn conversational edits to adjust component spacing, color accents, or microcopy without restarting from scratch.
Responsive Viewport Testing
Paico generates responsive web, tablet, and mobile layouts. Designers should systematically audit the layout across viewports:
- Verify that multi-column data tables collapse into mobile-friendly cards or horizontal scroll frames.
- Confirm that primary action buttons remain accessible within thumb reach on mobile screens.
- Check that typography scaling maintains adequate legibility without unwanted line wrapping on narrow screens.
Part 7: Team Feedback and Pixso Canvas Handoff
Once a viable interface direction is established in Paico, transition the draft toward collaborative team evaluation:
- Shareable Web Previews: Generate a Paico preview link to collect feedback from product managers and developers. Frame review questions around operational usability: Is the primary call to action immediately identifiable? Are critical alerts clear? Is essential data obscured?
- Syncing to Pixso for Advanced Vector Refinement: For teams requiring pixel-level vector manipulation, team library token mapping, or complex interactive prototyping, export or sync the design into Pixso.
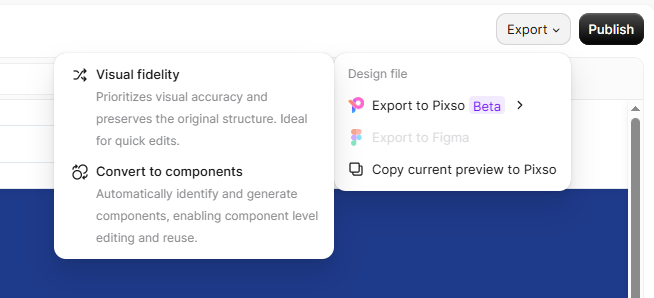
Verification Checklist Upon Importing into Pixso
Because generative imports do not represent a lossless vector translation, always conduct an audit on the Pixso canvas:
- Inspect layer groupings to ensure shapes remain editable vector paths rather than flattened bitmaps.
- Map generic colors, typography styles, and corner radiuses to your official Pixso Team Library tokens.
- Confirm that auto-layout frames, padding, and resizing constraints follow your design system rules.
- Reconnect interactive prototype wires and verify modal overlay triggers.
Part 8: Code Inspection Without Confusing Drafts with Production
Paico's Code Mode allows designers and frontend engineers to inspect generated layouts, CSS variables, and component hierarchies. Pairing Claude Sonnet 4.6 with React output provides a concrete technical baseline for early developer discussions.
However, teams must maintain clear boundaries regarding generated code:
- Scaffolding vs. Production: Generated React and HTML code serves as an architectural prototype. Frontend developers must review component structure, DOM semantics, accessibility attributes (ARIA), performance, security, and integration with backend APIs.
- Copy and Data Validation: Generative models draft realistic placeholder metrics and copy. Verify industry terminology, regulatory compliance, data privacy considerations, and internationalization expansion rules before release. Claude can organize provided constraints, but cannot substitute for subject-matter experts.
Part 9: Start with One Complex Screen
Start with a screen that has several related states, such as a table with filters, an empty result and a detail panel. Describe those states in the prompt, then use follow-up instructions to fix the parts that need work. This gives Claude Sonnet 4.6 in Paico a focused task and gives you a result that is easier to edit.