Scott
You capture a great photo of a product or subject, but the background falls flat. A product shot for an e-commerce page might look too plain against a solid wall, or a landscape photo might lack the dramatic sky you envisioned. In traditional photo editing, replacing a background meant manually tracing subject edges, erasing pixels, and blending lighting across complex layers. Today, AI allows you to perform an image background change simply by describing your target environment in plain language or choosing from generated background options.
In this guide, we will explore practical examples of background replacement using Pixso, featuring product shopping bags, coastal lighthouses, and floral photography. We will also cover step by step editing workflows and prompt engineering tips to help you achieve natural visual results.
Part 1. Why You Need to Change Image Backgrounds
An image background sets the emotional context and strategic purpose of a design asset. Placing a product against a plain studio background creates a clean catalog visual, while placing that same product inside a modern kitchen or cafe shows viewers how it fits into daily life.
The same principle applies to landscape photography. Shifting a background sky from clear midday sun to a golden hour sunset or dramatic overcast storm allows you to create completely different content moods from a single base photo.
Common Scenarios Requiring Background Edits
- E-Commerce Product Pages: Aligning product photography with brand guidelines and seasonal campaign themes.
- Social Media & Ad Creatives: Generating multiple background variations from a single photo shoot to test ad performance.
- Portrait Retouching: Cleaning up cluttered or distracting outdoor backgrounds behind subjects.
- Landscape Photography: Modifying skies, weather conditions, or time of day to enhance atmospheric depth.
- Blog Assets & Presentation Decks: Customizing stock photos to fit specific presentation themes or web hero sections.
- Seasonal Marketing Campaigns: Adapting core product visuals for summer, autumn, or holiday promotions without reshooting.

Background Removal vs. Background Replacement
Understanding the distinction between these two editing techniques helps you choose the right approach for your visual assets:
Background Removal
Deletes the background entirely, leaving a transparent canvas or solid color fill. This is ideal for creating PNG cutouts, standalone product listings, or assets intended for vector layout overlays.
Background Replacement
Replaces the original environment with a rich new location, studio setting, or outdoor scenery. This approach is best for showcasing product lifestyle context or changing the mood of a photograph.
If you need a quick asset cutout, simple removal is sufficient. However, if you want your visual to tell a story or fit a specific campaign theme, applying a new background environment is far more effective.
Part 2. Practical Examples of Pixso AI Background Replacement
Pixso is a collaborative online UI/UX design platform that combines layout editing with built-in AI image features. Once you import a photo onto your canvas, you can replace its background and apply the updated graphic directly to your web banners, app screens, or ad layouts.
Example 1. Replacing a Shopping Bag Studio Background with a Café

In this product shot, yellow and blue shopping bags originally sat against a simple blue studio backdrop. After applying AI background replacement, the bags retain their original shape, color, and position, while the background shifts into a warm café setting with a wooden table and sunlit windows.
While plain studio shots work well for minimal product catalogs, lifestyle backgrounds add context and brand warmth, making them ideal for e-commerce hero banners, social media ads, and seasonal promotions.
Sample Prompt:
"Keep the yellow and blue shopping bags unchanged in shape, color, and placement. Replace the blue studio wall with a warm café interior featuring large sunlit windows and a wooden table. Add realistic soft shadows underneath the bags matching the ambient indoor lighting."
Example 2. Modifying Sky and Atmosphere in Lighthouse Landscape Photography
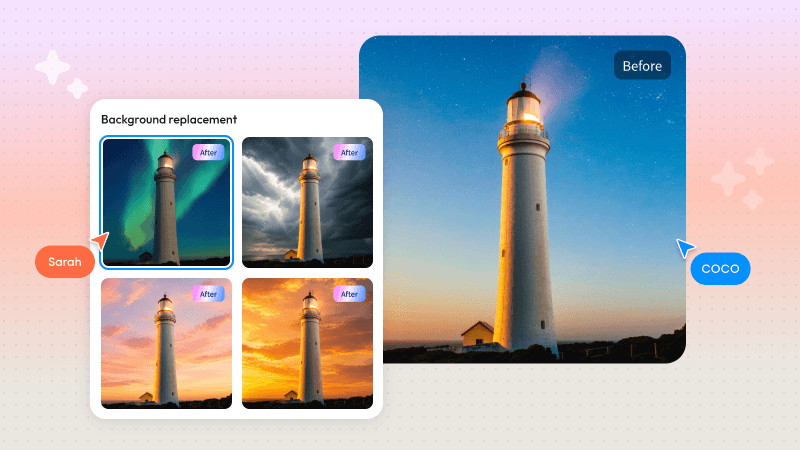
In this landscape example, a coastal lighthouse serves as the central focal point. By holding the lighthouse structure and shoreline steady, the AI can apply multiple atmospheric variations, including aurora borealis, overcast storm clouds, pink dusk sunsets, and golden hour light.
Achieving realism requires more than swapping sky colors. The lighting cast across the lighthouse structure must adapt to the new atmosphere. A sunset background requires warm orange highlights along the edges, while an overcast sky calls for soft, diffused shadows.
Sample Prompt:
"Maintain the lighthouse structure, shoreline, and camera angle. Replace the background sky with a sunset featuring warm orange and pink tones, and cast subtle sunset highlights across the lighthouse surface."
Example 3. Transforming Backgrounds for Floral Photography
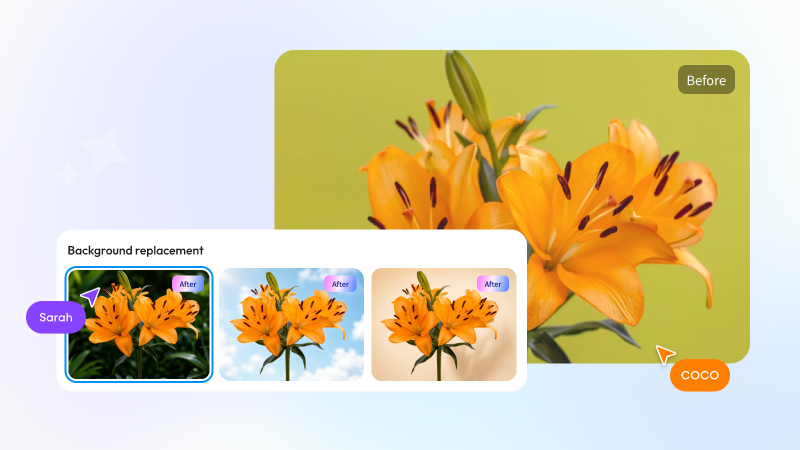
In this floral shot, an orange lily remains the primary subject while its surrounding environment changes. Setting the flower against dark natural foliage creates a lush garden impression, while placing it against a bright blue sky creates a clear, vibrant visual.
Switching to a neutral beige studio background makes the orange petals pop with crisp clarity. By testing different background options, design teams can repurpose a single floral asset for editorial articles, seasonal campaigns, or commercial ad banners.
Sample Prompt:
"Keep the orange lily petals, stem, and overall composition completely unchanged. Replace the green background with a smooth beige studio backdrop, ensuring clean petal edge definition and soft directional lighting from the upper right."
Part 3. How to Change Image Backgrounds in Pixso
Whether you are editing a standalone photo or modifying an asset placed inside a complete UI design frame, the workflow in Pixso remains seamless.
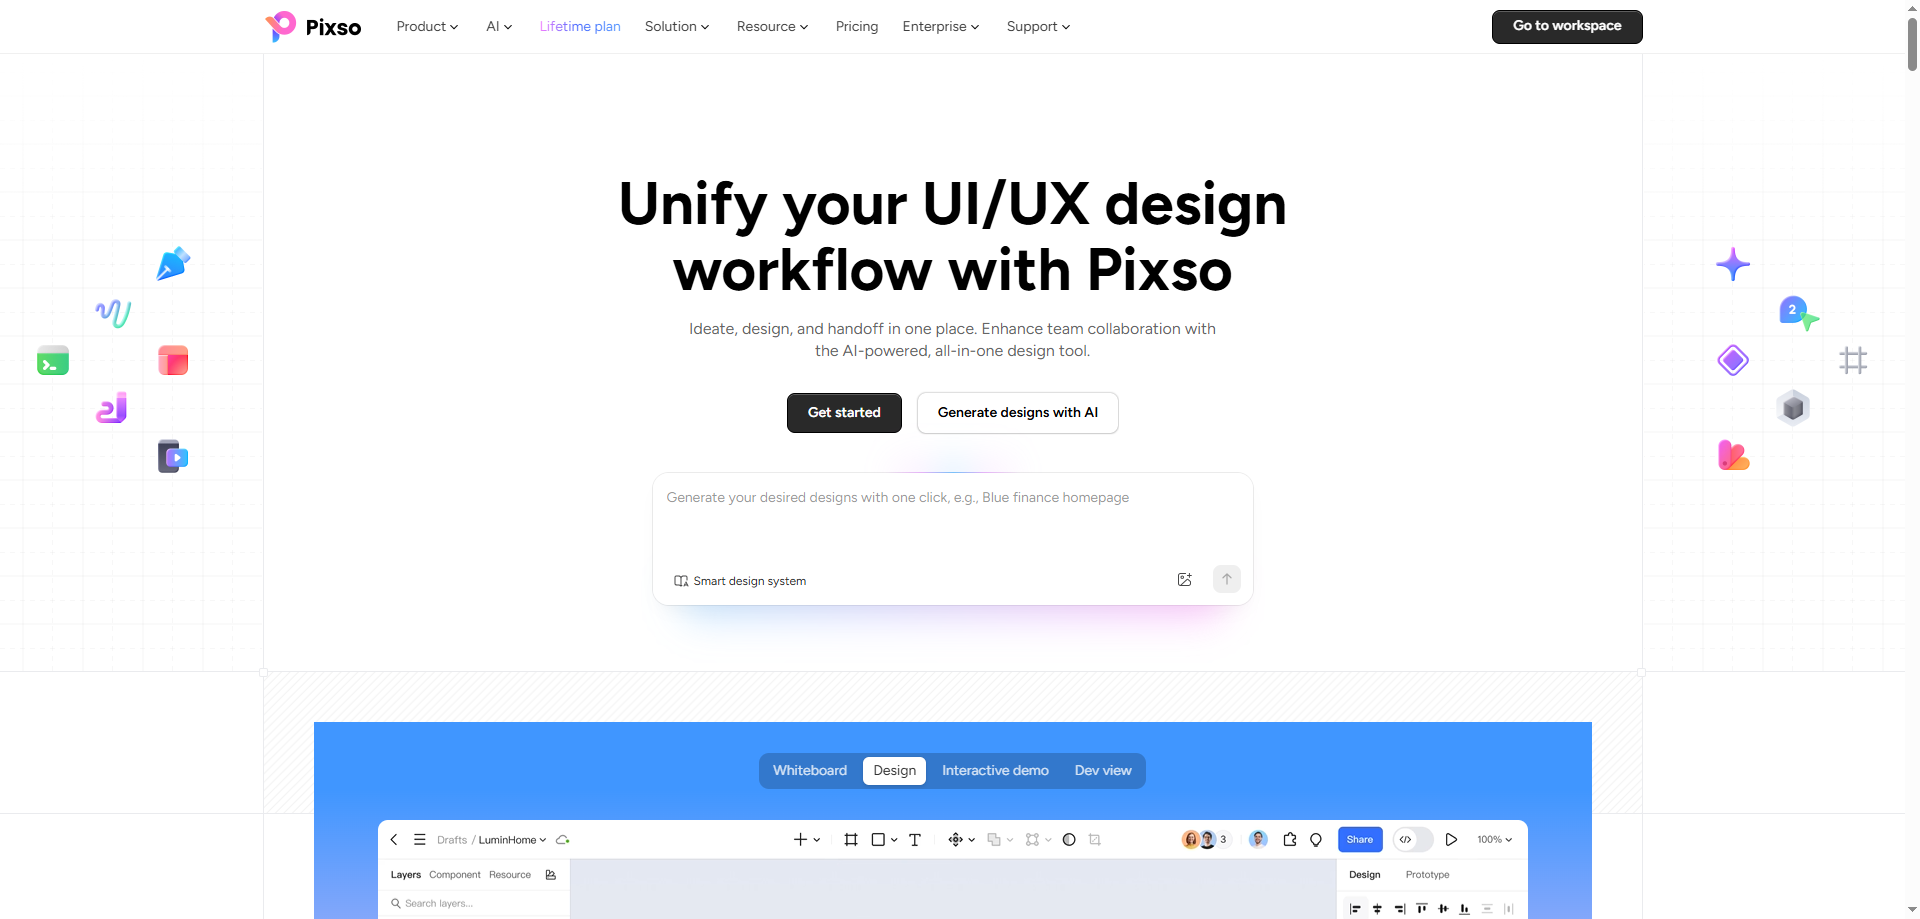
Step 1. Log in and Create a Pixso Design File
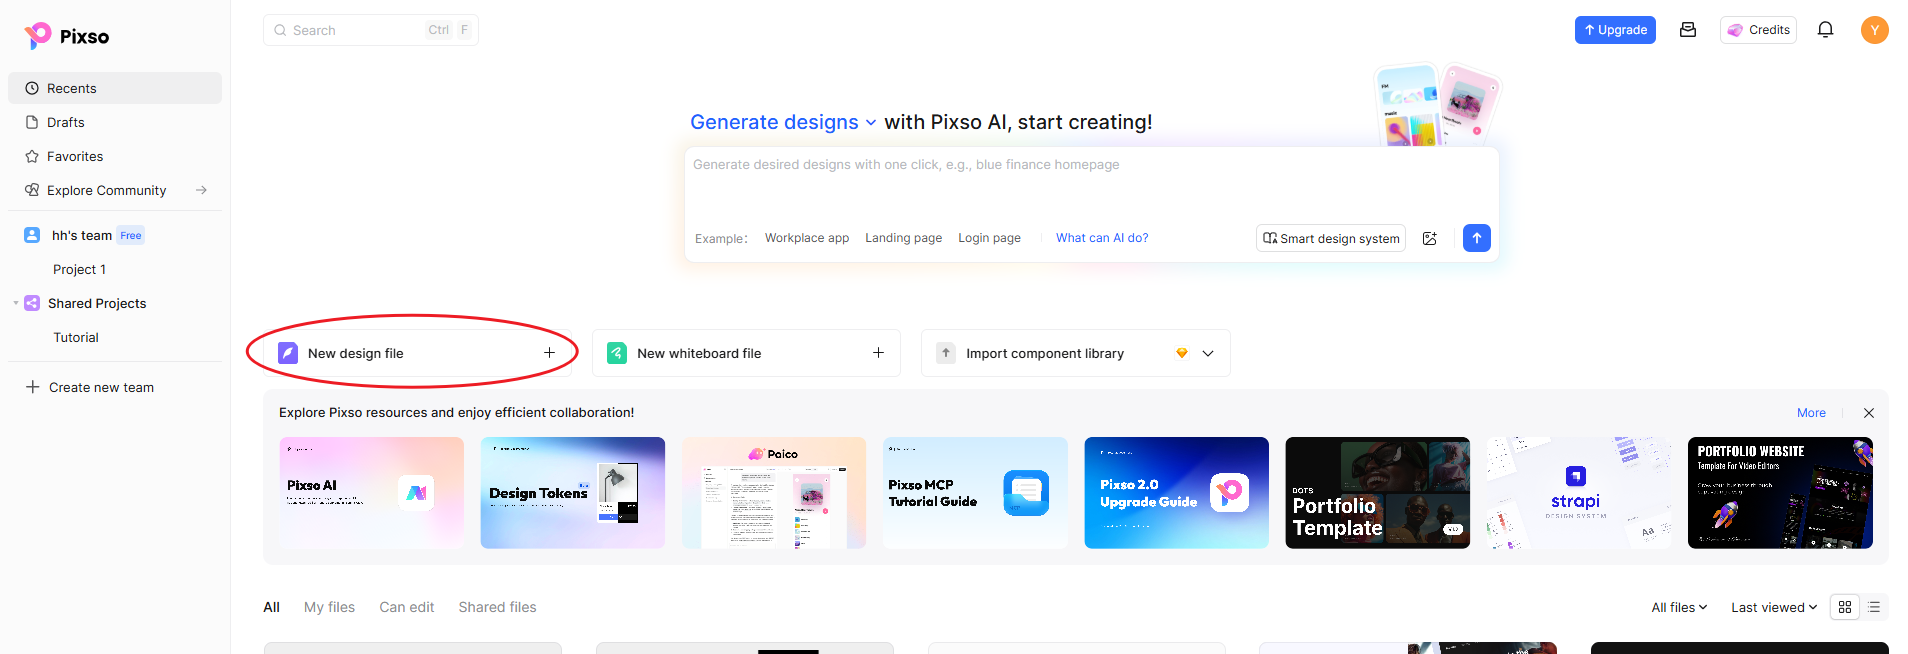
Sign in to Pixso, navigate to your workspace, and open a new design canvas. If you are editing an existing prototype or banner layout, open that project file directly.
Step 2. Import Your Image Asset
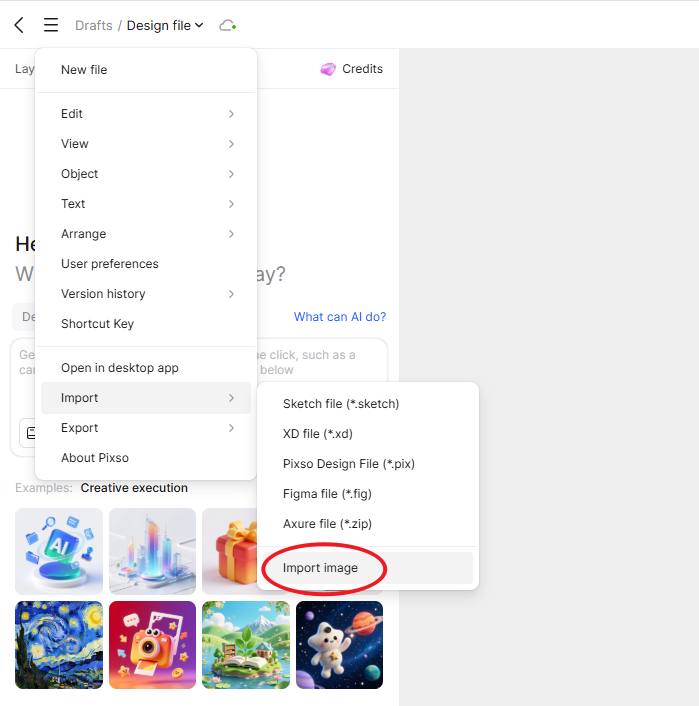
Place your source image onto the workspace. You can edit an isolated photo file or select an image layer positioned inside a UI frame.
For optimal background replacement results, use source images with:
- Clear subject boundaries and high edge contrast
- Unobscured main subjects
- Sufficient image clarity and high resolution
- Minimal motion blur or heavy camera distortion
If your source photo lacks clarity, consider using an image resolution upscaler to sharpen edge details before attempting complex background replacements.
Step 3. Launch AI Image Mode
Select the target image layer on your canvas, open the AI menu from the left toolbar, and select Image Mode. Double click the photo so the AI identifies the active layer.
Step 4. Select or Generate Background Environments
Explore recommended background presets or test generated options. Testing multiple environmental styles side by side on your canvas helps you evaluate which lighting and color scheme pairs best with your main subject.
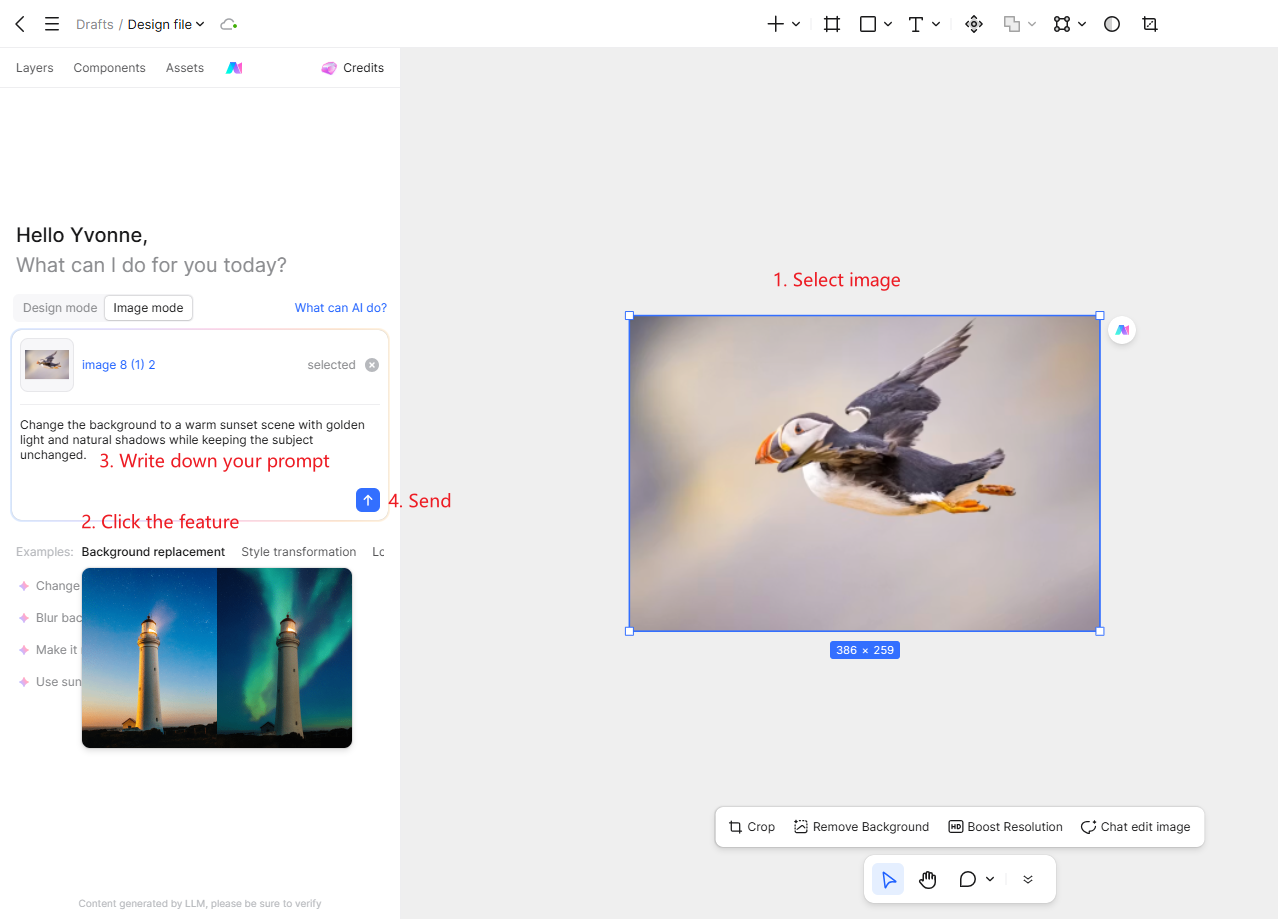
Step 5. Fine-Tune with Custom Prompts
If preset backgrounds do not match your vision, enter custom text instructions into the AI prompt bar. Define the location, lighting, color tone, and specific elements to retain.
Step 6. Compare Outputs and Integrate into UI Layouts
Place the modified image side by side with your original photo to check subject integrity, edge blending, and shadow realism. Once approved, adjust its scale and placement within your Pixso artboard, adding text, vector buttons, logos, and layout components to finalize your design asset.
Part 4. Writing Effective Background Replacement Prompts
To get predictable outputs from the background-replacement feature in a free online image editor, state both the subjects you want to retain and the new environment you want to generate.
Basic Prompt Formula
"Maintain [Primary Subject] in its original shape, color, and position. Replace the background with [Target Location / Weather / Time of Day], and ensure [Lighting / Shadows / Perspective] blend naturally with the subject."
Scenario Prompt Examples
- Product Photography:
"Keep the product bottle shape, label text, and position unchanged. Replace the plain background with a bright beige studio surface, and cast soft natural sunlight shadows beneath the bottle." - Portrait Photography:
"Preserve the subject's face, hair detail, apparel, and pose completely. Replace the background with a modern, sunlit office interior, ensuring soft edge lighting blends naturally along the subject's outline." - Landscape Sky Replacement:
"Maintain the lighthouse, rocky ground, and horizon framing. Replace the overcast sky with a dramatic dusk sunset featuring pink and orange clouds, casting warm light reflections onto the land." - Floral Photography:
"Keep the orange lily petals and stem intact. Replace the dark foliage background with a clear blue sky and soft white clouds, maintaining crisp petal edges."
Prompting Troubleshooting Tips
- Clearly define the boundary between the focal subject and the environment.
- Avoid requesting major changes to both the subject and the background in a single prompt iteration.
- Include environmental parameters like time of day, weather, and light direction.
- Explicitly request matching surface shadows underneath subjects to prevent floating visuals.
Part 5. Best Practices for Natural Visual Results
1. Choose Backgrounds Suited to Product Goals
Clean studio backdrops highlight product construction and specs for e-commerce listings. Lifestyle backgrounds, like cozy cafes or modern offices, work better for social media ads and brand storytelling campaigns.
2. Match Camera Perspective and Horizon Lines
Placing an eye-level subject against a background shot from an extremely high angle creates visual distortion. Always select background environments that match the original camera height and horizon angle.
3. Leverage Color Contrast
If a subject shares similar color tones with its background, it can blend in and lose visual impact. Choosing contrasting environment colors, such as pairing an orange lily with a clear blue sky or a beige studio, makes key subjects stand out cleanly.
4. Compare Multiple Environment Options
Avoid settling on the first background iteration. Generating and comparing studio, indoor, and outdoor variations side by side on your canvas helps you choose the best visual for your campaign goals.
5. Upscale Low Resolution Assets
If your source photo appears soft or pixelated, running it through an image resolution upscaler ensures that subject edges remain sharp when combined with newly generated high-definition backgrounds.
💡 Pro Tip
Want to learn how to unblur soft focus portrait shots or sharpen facial features before changing backgrounds? Read our comprehensive guide:
🔗 [NEW] How to unblur images & sharpen portrait photos with AI
FAQ
Q1. Can I keep my primary subject untouched while replacing the background?
Yes. By specifying the subject name and explicitly stating "keep form, color, and position unchanged" in your prompt, the AI replaces only the surrounding environment.
Q2. Can I replace a background with plain white or transparent fill?
Yes. You can generate solid white or beige studio backdrops for e-commerce listings, or use background removal tools to create transparent PNG cutouts for custom graphic compositions.
Q3. What photos work best when learning how to change the backgrounds of image assets?
Photos with distinct subject outlines, clear edge contrast, and good lighting produce the cleanest background integrations. Extremely blurry or low contrast images benefit from preprocessing with an image resolution upscaler first.
Q4. Will changing the background alter my product or subject details?
Generative AI occasionally adjusts edge pixels during background synthesis. Always compare the transformed image against your original asset to verify that logos, text, and product silhouettes remain accurate.
Q5. Can I perform an image background change on standalone photo files without a UI prototype?
Yes. You can import individual image files directly onto a blank Pixso canvas, apply AI background features, and export your updated graphics immediately.
Q6. Can I test multiple background styles on a single source photo?
Yes. You can duplicate your source image on the Pixso canvas and apply different prompts to generate studio, outdoor, and lifestyle variations side by side.
Q7. What makes Pixso an efficient workspace for asset editing and UI design?
Pixso functions as both a design layout tool and a free online image editor with background replacement. Designers can modify photo backgrounds, upscale image resolution, and design complete app layouts on a single collaborative canvas.
Conclusion
AI background replacement allows product teams and designers to transform visual assets without scheduling costly reshoots. Whether you are placing a shopping bag in a warm café, adding a sunset to a lighthouse landscape, or testing studio backdrops on floral photography, AI simplifies creative asset production.
By using Pixso, you can perform an image background change, compare multiple creative iterations, and design complete user interfaces within a single collaborative workspace. Try Pixso AI today to streamline your asset editing and UI design workflows.