Scott
How to use Claude for UI design: define the user, task, information architecture, states, and visual constraints in a structured prompt, then review and refine the editable result in Pixso AI. This guide shows a practical workflow for using Claude Sonnet 4.6 inside Pixso to move from a UI brief to an editable interface, prototype, and developer handoff.
How to Use Claude for UI Design: A Practical Workflow
Use this sequence when you want Claude to help with a real interface rather than a one-off visual concept:
- Define the product context: name the user, job to be done, platform, and business goal.
- Describe the information architecture: list the navigation, content hierarchy, key modules, and relationships between screens.
- Specify states and constraints: include loading, empty, error, permission, responsive, accessibility, and brand requirements.
- Generate in Pixso AI: select Claude Sonnet 4.6 in the model selector, use Design mode, and generate an editable layout.
- Review the result: check hierarchy, copy, spacing, component reuse, responsive behavior, and state coverage before presenting it.
- Prototype and hand off: connect the important flows, collect comments, and inspect the approved design for development.
This workflow keeps Claude responsible for structured exploration while the design team remains responsible for product decisions, accessibility, and release quality.
Complex digital interfaces rarely fail because a designer cannot sketch another card. They break down when business rules, multi-state data dependencies, component logic, and engineering handoffs fall out of alignment.
Within Pixso AI, designers can select Claude Sonnet 4.6 directly from the in-canvas model selector to generate editable, structured vector interfaces. Labeled in the selector as the designated model for "complex tasks, detailed & complete", it is tailored for multi-module workflows that require deeper structural comprehension than a standard visual wireframe.
Claude UI Prompt Template
Use the following structure as a starting point for a Claude UI design prompt:
Design a [platform] interface for [user] who needs to [primary task]. Include [navigation and key modules]. Show [required states], use [brand, typography, spacing, and accessibility constraints], and keep [fixed elements] unchanged. Provide an editable layout with realistic labels and content, plus a clear path from [entry point] to [success state].
Replace each bracketed item with project-specific information. A detailed prompt helps the model organize the interface, but it does not replace user research, content review, accessibility testing, or engineering validation.
Part 1: What Claude Sonnet 4.6 Contributes to Complex UI Work
Anthropic introduced Claude Sonnet 4.6 with benchmark enhancements across code generation, long-context reasoning, multi-turn instruction following, and nuanced design comprehension. A dense product screen demands these capabilities because it must simultaneously express user goals, organizational policies, data hierarchies, and responsive behavior.
Inside Pixso, Claude Sonnet 4.6 is positioned for dense dashboards, role-based administration consoles, multi-step configuration flows, and workspaces where navigation states, cross-module data dependencies, and component rules must remain aligned. While Anthropic documents an extended context window (up to 1M tokens in beta) for its direct API, designers should judge the integration by the concrete output and layer hierarchy generated within the Pixso canvas.
Before selecting a model, evaluate the structural complexity of your interface challenge:
Framework: Structuring Prompts for Claude Sonnet 4.6
| UI Design Challenge | What the Prompt Should Instruct the Model to Structure | What the Designer Must Verify on Canvas |
| Dense Data Dashboard | Establish visual hierarchy across charts, global filter bars, KPI summaries, and data tables. | Semantic data accuracy, chart archetype suitability, and visual weight balance. |
| Role-Based Admin Console | Differentiate view-only states from administrative actions and conditional management controls. | Security boundaries, unauthorized state handling, and destructive confirmation modals. |
| Multi-Step Configuration Flow | Maintain layout continuity across sequenced steps, input groups, and nested field dependencies. | Drop-off friction, error recovery paths, and progress persistence. |
| Responsive Enterprise Form | Organize form fields into logical sections, including required markers, helper text, and validation states. | Tab navigation order, mobile stacking behavior, and accessible label contrast. |
Claude Sonnet 4.6 can generate a coherent structural draft from detailed specifications, but it cannot validate real customer intent or uncover missing business requirements. A visually complete screen still requires rigorous human design critique.
Part 2: Why the Pixso Integration Changes the Result
Generating interface concepts within a standalone chat window creates a tedious bottleneck: designers are left manually redrawing layouts or piecing together static vector exports. Pixso bridges this gap by integrating generative AI into a unified environment supporting Pixso AI UI design, whiteboarding, vector editing, component management, interactive prototyping, and developer handoff.
Pixso AI operates directly inside the editor canvas. Rather than producing a flat raster image, its text-to-design engine generates structured, editable vector layers, standard frames, and adjustable typography. Designers can immediately inspect layer groups, update padding, swap styles, and connect approved design tokens.
A professional AI design workflow must support brand guidelines, state variations, accessibility adjustments, and team review. By pairing Claude's analytical comprehension with Pixso's editor, teams translate detailed prompts into structured, editable vector layers, components, and layout properties, allowing product managers, designers, and developers to iterate on a single source of truth.
Part 3: How to Select Claude Sonnet 4.6 in Pixso AI
The operational path inside the editor is direct, but selecting the proper mode is critical:
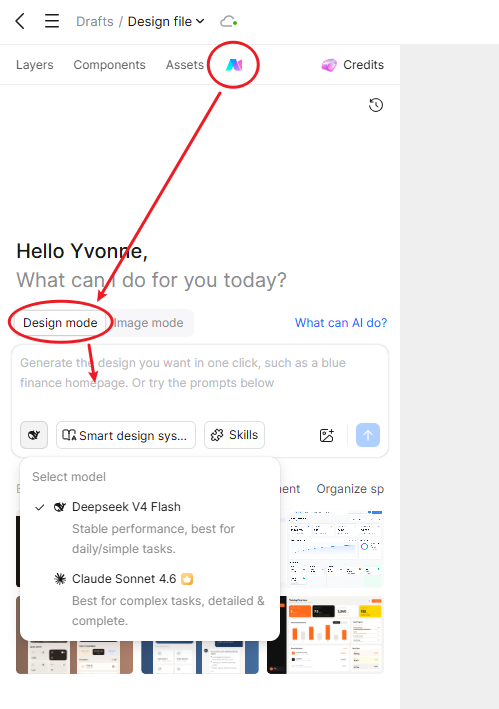
- Sign in to Pixso and open a design file with edit permissions.
- Launch the AI assistant by clicking the AI icon in the top navigation bar or toolbar.
- Select Design mode at the top of the AI dialog. (Note: Keep the toggle on Design mode for editable UI layouts; Image mode is dedicated to raster visual assets.)
- In the prompt frame, click the model selector button located next to the skills bar.
- In the Select model dropdown menu, choose Claude Sonnet 4.6 (indicated with the badge for complex, detailed tasks).
- Enter your structured design specification into the prompt field and click Generate.
- The generated layout will render directly onto your active Pixso canvas as an organized, editable frame. From there, refine specific elements rather than regenerating the entire screen from scratch.
Part 4: Write a Prompt That Behaves Like a UI Specification
For exploratory wireframes, a brief sentence may suffice. For a multi-faceted enterprise screen, structure your prompt like a functional specification document across six dimensions:
- Context & Persona: Product domain, target user role, platform, and primary task.
- Information Architecture: Primary navigation, structural regions, and hierarchical relationships between modules.
- Content & Data: Realistic metric names, form labels, column headers, and sample data (avoid generic "Lorem Ipsum").
- State Behavior: Default view, loading skeletons, empty data states, error banners, and permission differences.
- Visual Standards: Grid density, contrast requirements, 8px spacing increments, and typography scales.
- Boundaries & Constraints: Specific components that must remain fixed versus areas open to exploration.
Practical Complex Prompt Example:
"Design a desktop fleet management operations dashboard for a regional logistics supervisor. Include a collapsible left navigation, an urgent exceptions banner, a primary KPI row (Active Routes, Delayed Shipments, Driver Compliance, Fleet Fuel Index), a real-time interactive route map frame, a filterable shipments table with status badges (On-Schedule, Delayed, Critical), and a contextual right-side drawer showing driver inspection logs. Provide view states for Dispatcher (edit permissions) and Auditor (read-only). Use an enterprise slate palette (#0F172A base), high-contrast accessible status indicators, consistent 8px padding, and auto-layout frames ready for responsive scaling."
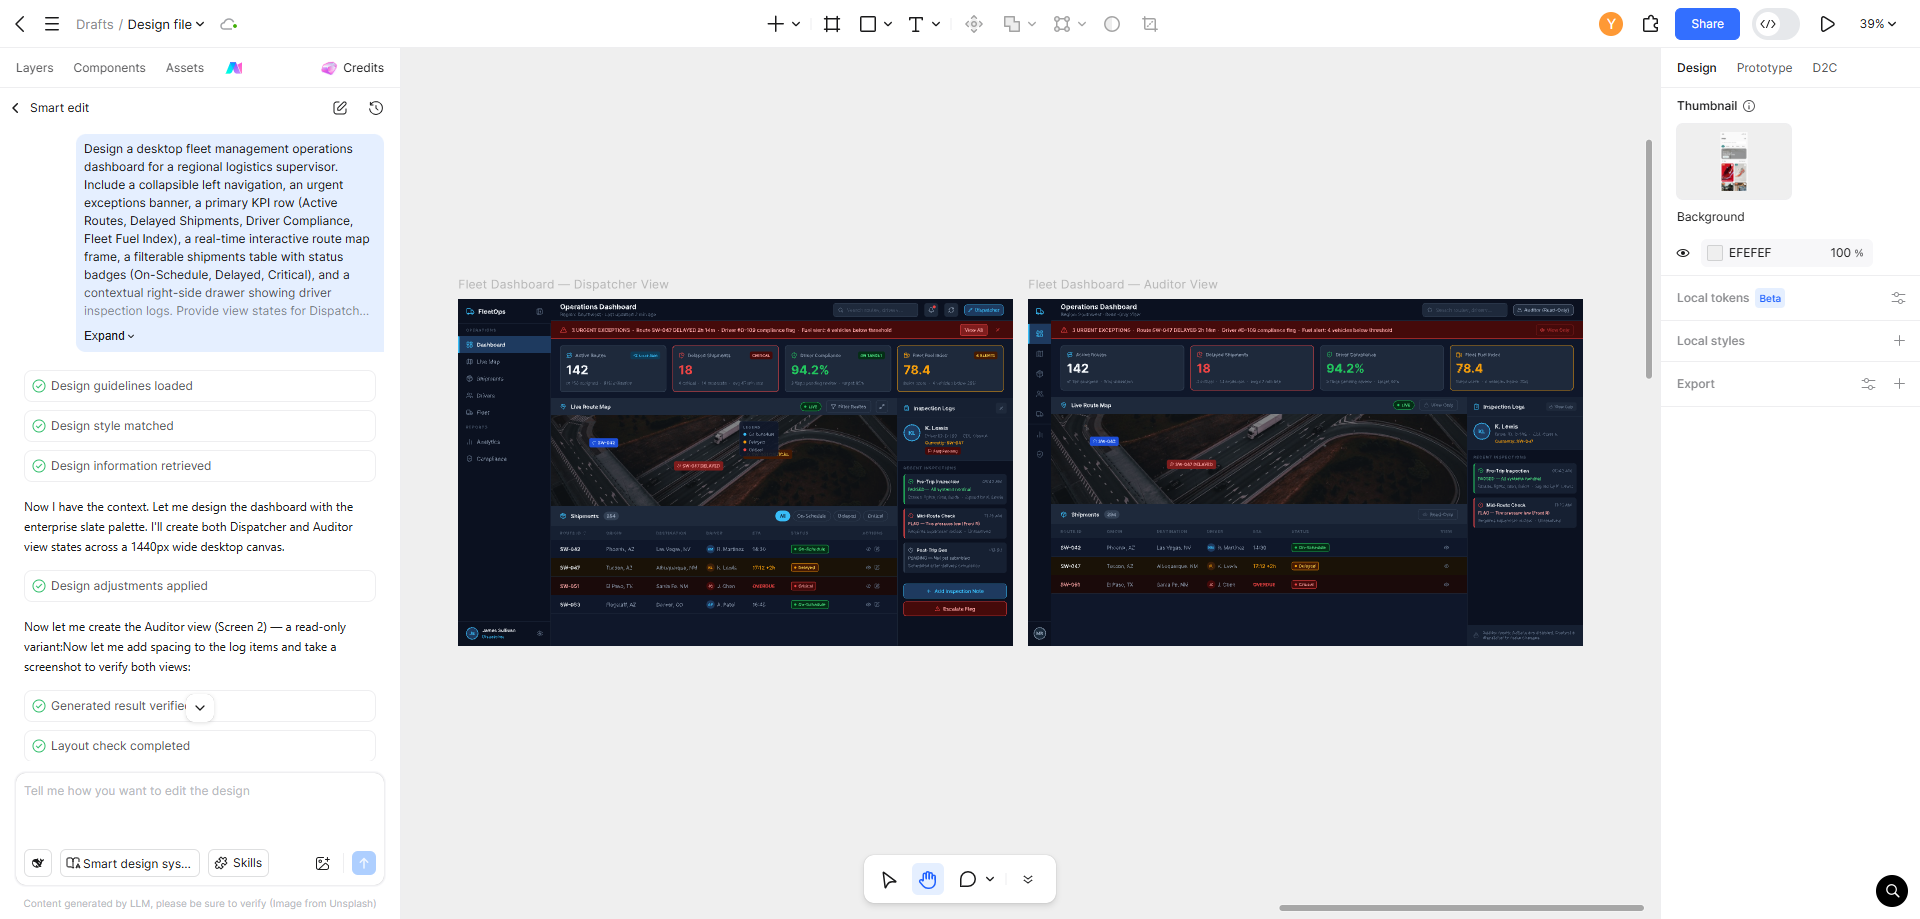
To iterate, select a specific child frame on the canvas and issue a constrained command:
"Keep the left navigation and map module unchanged; update the shipments table to show an expanded row state displaying shipment manifest items and a secondary action button for Re-routing."
What Claude Can and Cannot Do for UI Design
Claude can help turn a structured brief into interface directions, screen content, and layout alternatives. In the Pixso workflow described here, the generated result can be reviewed and refined as editable design layers. Claude still cannot confirm whether a requirement is correct, prove that a flow works for real users, or guarantee production-ready code. Validate business rules, responsive behavior, accessibility, permissions, and technical feasibility before handoff.
Part 5: Refine Detail with Pixso AI Tools
The initial AI generation provides a structural baseline. Designers can then use Pixso AI's integrated toolkit to refine details without manual overhead:
Pixso AI Refinement Capabilities
| Capability | Useful Application on a Complex Screen | Required Control & Operational Boundaries |
| Smart Editing | Modify selected layout properties, colors, or sizing using conversational text instructions. | Define the exact selection scope to prevent unintended canvas-wide changes. |
| Smart Layout | Apply Auto Layout more consistently to related layers, standardizing gaps and alignment. | Limitations: Does not apply to isolated single layers or canvas Sections. Layers with Auto Layout already configured are skipped. |
| Smart Rename | Replace generic default names (e.g., 'Frame 428') with semantic labels (e.g., 'Table_Row_Active'). | Limitations: Skips primitive vectors, plain text nodes, component instances, locked layers, and hidden elements. |
| AI Smart Search | Locate relevant team components or community assets using natural language queries. | Prioritize approved enterprise library components over generic assets. |
| Smart Text | Translate UI strings, generate contextual data entries, or shorten text to test line wraps. | Verify legal compliance, terminology conventions, and localized string expansion. |
| Image Editing | Remove background artifacts or upscale graphic assets used within cards. | Confirm asset licensing and edge clipping quality against dark and light surfaces. |
Workflow Recommendation: Progress from macro to micro decisions: first validate page architecture and information hierarchy; next check layout responsiveness; finally adjust typography, color accents, and microcopy.
Part 6: Anchor Generation to a Design System
Complex outputs will drift into inconsistency if successive generations introduce arbitrary margins, unapproved hex codes, or conflicting corner radiuses.
Pixso organizes and applies reusable design standards—including master components, color styles, typography variables, and effect presets:
- Foundational System Generation: For new projects, use Pixso AI to generate an initial design system from a brand color, establishing consistent typographic scales, spacing tokens, and surface elevations.
- Component Replacement: In mature products, replace generated placeholder elements with verified components from your centralized Pixso Team Library.
- Pre-Review Checklist: Run the Pixso AI Design Checklist before stakeholder reviews. Configure specific criteria for accessibility contrast (minimum 4.5:1 for body copy), 44px minimum touch targets, keyboard focus indicators, error notifications, and text-overflow truncation rules.
Part 7: Test the Flow Through Collaborative Prototyping
A multi-module interface may appear balanced statically while harboring broken navigation logic. Pixso allows designers to transition from static frames to interactive prototypes on the same canvas:
- Wire Interactions: Switch to the Prototype tab and connect buttons, rows, and drawers to target screens or overlay frames using click, hover, or timed delay triggers.
- Multiplayer Stakeholder Review: Generate a secure share link for product managers, engineers, and QA leads. Stakeholders can click through the prototype and leave contextual comments pinned directly to specific UI coordinates.
- Presentation readiness: test the prototype on the device and network intended for the review. If an offline export or caching mode is available, verify its supported interactions and prepare a fallback; do not assume a buffer-free walkthrough.
Review discussions should focus on operational usability: Are critical alerts immediately distinguishable? Is any essential data hidden beneath excessive clicks? Does the navigation remain clear during error states?
Part 8: Carry the Approved UI into D2C Handoff
Pixso's Design-to-Code (D2C) workflow helps teams bridge the divide between design files and production frontends. Through Dev View, developers can inspect layout coordinates, view component properties, and extract code assets directly.
Using shared links helps teams reference the current shared design rather than relying on outdated static exports. To maintain baseline stability, teams should establish frozen version checkpoints or design sign-off markers before sprint execution.
Pixso supports structural code delivery for React, Vue, HTML, ArkUI, and Flutter:
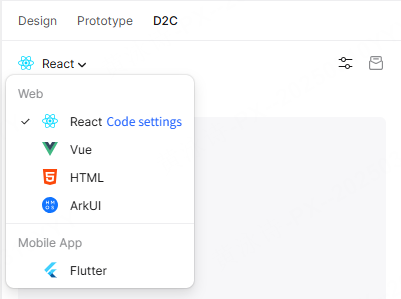
- Inspection Baseline: Engineers can extract CSS Flexbox properties, SVG icons, typography variables, and component boilerplate.
- Engineering Review Scope: Generated D2C code serves as a structural scaffold. Developers must evaluate component architecture, DOM semantics, accessibility attributes (ARIA), state management, API integration, and security constraints. Standardizing components and variables in Pixso makes code inspection and component reuse more predictable for engineering teams.
FAQ: Using Claude for UI Design
Can Claude design a complete UI?
Claude can help create a structured first pass and explore layout alternatives. A designer still needs to review content, states, accessibility, responsive behavior, and product requirements.
How do I prompt Claude for UI design?
Include the user and task, information architecture, realistic content, state behavior, visual standards, and boundaries. The template above provides a reusable starting point.
Can I use Claude inside Pixso?
In the Pixso workflow covered by this article, select Claude Sonnet 4.6 from the Pixso AI model selector, keep Design mode enabled, and generate an editable interface on the canvas.
Does Claude create editable UI by itself?
Claude is the reasoning model in this workflow. Pixso AI is the design environment that renders the result as editable layers for review and refinement.
Part 9: Introduce the Workflow Without Disrupting the Team
Teams transitioning from legacy environments such as Figma, Sketch, or Axure do not need to rebuild their design equity from scratch:
- Batch Import Support: Pixso supports batch importing files from Figma (.fig), Sketch (.sketch), and Axure (.rp), alongside Adobe XD and SVG assets.
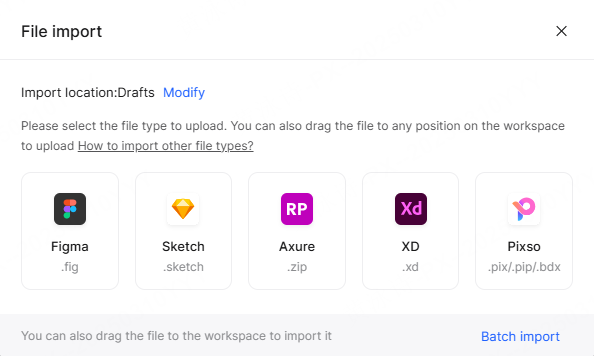
- Migration checks: compare imported shapes, artboards and styles with the source file, then inspect component variants, fonts, prototype triggers and Auto Layout.
- Pilot Implementation: Begin by selecting a single bounded enterprise workflow. Import the existing foundation into Pixso, use Claude Sonnet 4.6 to generate layout alternatives, refine them with Smart Layout, and conduct a structured handoff with developers to measure workflow efficiency.
Related Claude and UI Design Guides
- Claude Design complete guide for the broader Claude Design workflow.
- How to make a website with Claude for website and Vibe Coding use cases.
- Generate UI with Claude in Paico for a code-oriented UI generation path.
- Claude vs DeepSeek in Pixso for model selection context.
Conclusion
Use Claude in Pixso to draft a screen with detailed requirements, then refine the editable layers. Clear instructions about content, states and layout give you more control over the result.